
How to Photograph Products Without a Studio
You can photograph products without a studio by using any home or temporary space where you can control product support, camera or phone stability, lighting, background coverage, and working clearance. Build a stable baseline for those variables, capture the required views with only intentional changes, and check sharpness, exposure, colour, framing, and background cleanliness before dismantling the setup. If product size, reflective surfaces, or room geometry prevent repeatable control, adapt the space or use a more suitable shooting area.
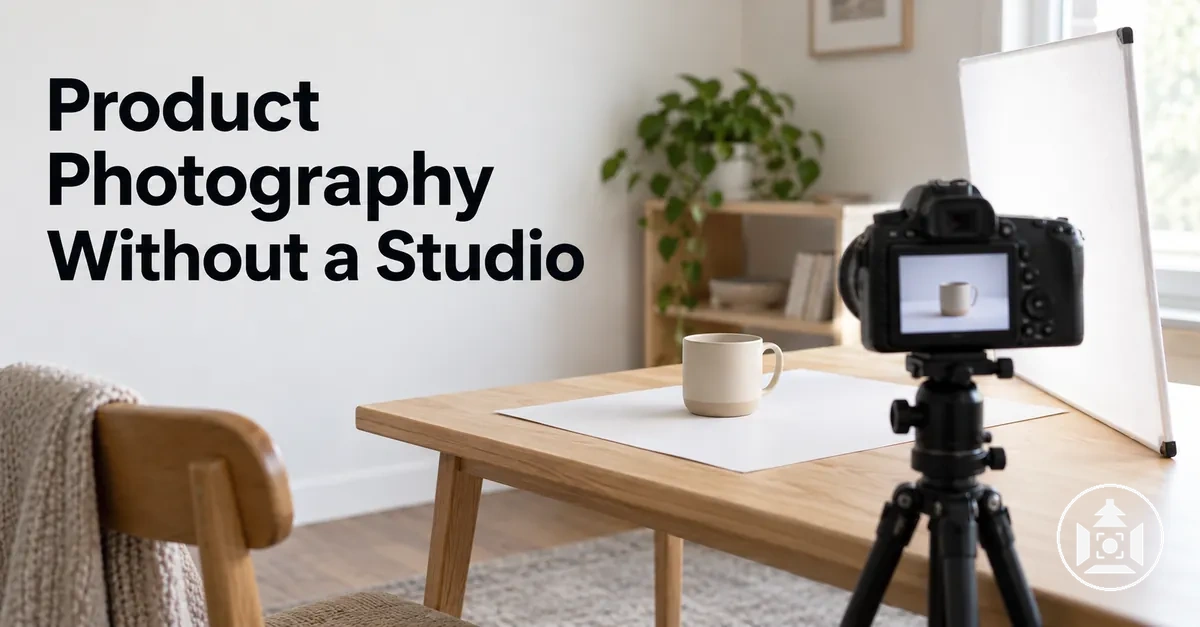
No-studio product photography setup plan
The setup is ready when each stage is controlled well enough to repeat the required shot set. If a stage fails, correct that condition before moving on.
A home setup or temporary shooting area can support a product shoot when it gives you workable control over the product and its surroundings.
The shooting space needs enough room for the product, background, controlled light, and a camera or phone on stable support.
Stability helps keep the capture position steady, while repeatability means the setup can be maintained or recreated consistently across the required shots.
Whether a particular non-studio setup is sufficient therefore depends on the product and the control available in that space; larger or more complex products may require more room or specialised control.
This approach refers to photographing a real, physical product in a home or temporary space, rather than generating product imagery with AI.
The practical starting point is to determine whether the available home area can function as a controllable shooting space for the product you need to photograph.
Table of Contents
Choose a Workable Shooting Area at Home
A workable shooting area is defined by the product size and the working distance needed for framing, light placement, and the background, not by whether the space is called a spare room, kitchen, or garage.
Judge the home setup by whether it provides both sufficient physical clearance and enough control to complete the shoot without repeatedly disturbing the arrangement.
The image labels the separate space used by the product, camera position, light position, and background so their relative clearance can be assessed before the setup is built.
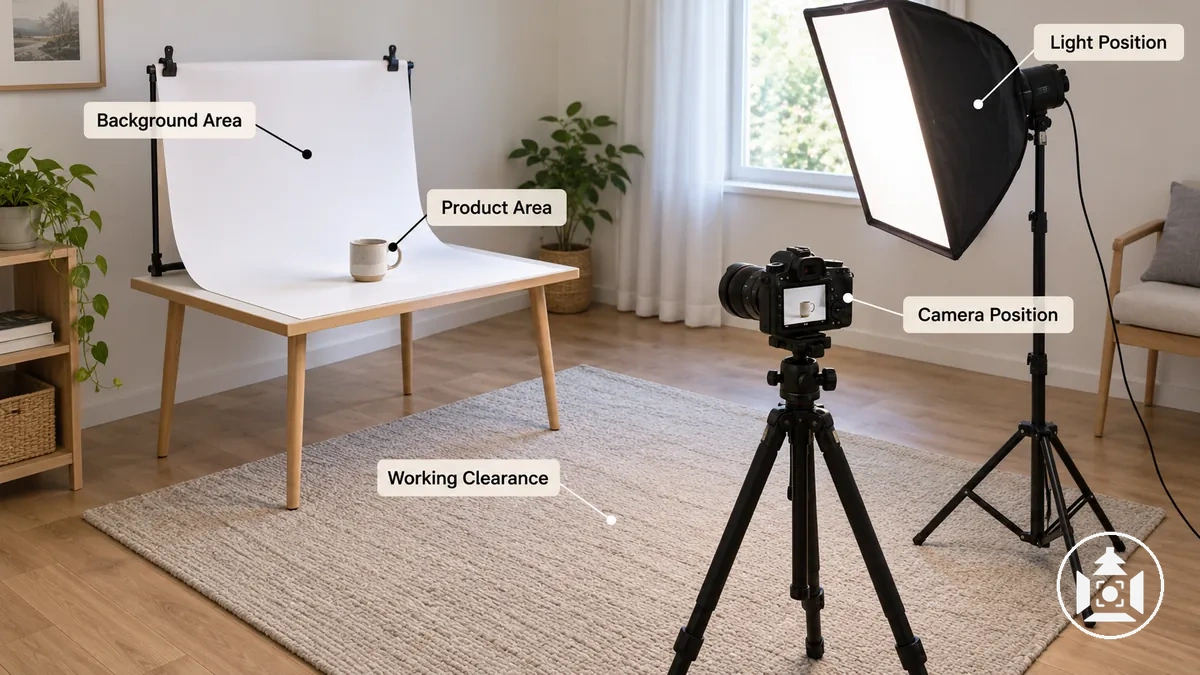
Use these criteria to separate physical fit from controllability when evaluating the available area:
- Product size: the shooting area must provide a usable surface that accommodates the product without forcing it against surrounding objects.
- Camera clearance: there must be enough working distance to position the camera or phone for the required framing without an obstruction forcing the capture position closer.
- Background depth: the available area must allow the background to extend behind and around the intended framing without unwanted surroundings entering the shot.
- Light placement: the area must leave room to position and adjust the light relative to the product rather than fixing it wherever unused space happens to remain.
- Ambient light control: changing daylight or other room lighting should be blockable, reducible, or deliberately incorporated when it would otherwise alter the illumination during the shoot.
- Setup persistence: the home setup should be able to remain undisturbed long enough to finish the required shots, preserving the product, camera, background, and light positions when repeatability matters.
A small tabletop product may fit comfortably in an area that becomes restrictive when a larger item requires more background coverage, camera clearance, and room for light placement.
The shooting area is workable only when all of these core functions fit and remain controllable without unstable compromises.
Match the Shooting Area to the Product Size and Camera Distance
Larger product dimensions generally require more surface space, background coverage, camera clearance, and room for light placement.
The exact camera distance is not a fixed value because the working distance needed for framing changes with product size, composition, focal length, and the characteristics of the camera or phone.
The diagram shows the relative change in working space for a smaller and a larger product rather than fixed measurements, making the relationship between product scale, camera position, and background coverage visible.
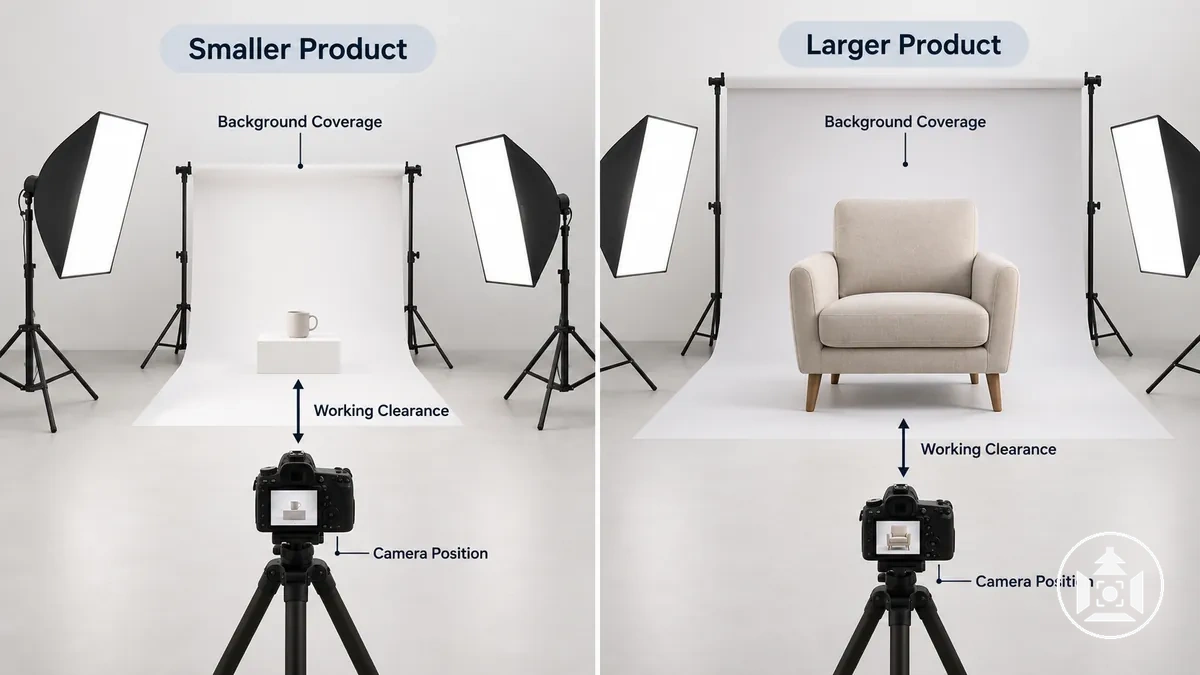
Use the product dimensions as the starting criterion and evaluate the required space outward from the subject:
- Width, height, and depth: greater product dimensions increase the surface area and surrounding clearance occupied by the subject.
- Background coverage: as the product occupies more physical space within the intended composition, the background must cover enough area behind and around it to maintain the required framing.
- Camera clearance: the required camera-to-product distance changes with framing and the characteristics of the camera or phone and lens, so the shooting area must allow the camera position to move rather than enforce one distance.
- Light clearance: increased product scale can require more working space around the subject so light placement remains outside the intended framing while covering the required product area.
For example, a small tabletop item may leave ample room on the same surface for the background, camera position, and light, while a bulkier product can consume that clearance and require a wider working area.
The useful test is whether the product and required framing fit with sufficient working distance for the camera, background, and light, rather than whether the room meets a fixed numerical rule.
Leave Enough Room for the Product, Background, Light, and Camera Position
The product position, background, light or diffusion, and camera position each need enough independent clearance to allow adjustment without forcing the rest of the setup to move.
Reserve this working room before placing equipment, with the amount of clearance based on the product scale, framing, and geometry of the available space rather than a fixed floor plan.
The diagram shows the four setup functions as separate zones with adjustment space between them.
Excessive overlap reduces control because changing one position can force changes elsewhere, so the useful goal is enough separation for each function to be adjusted while the others remain stable.
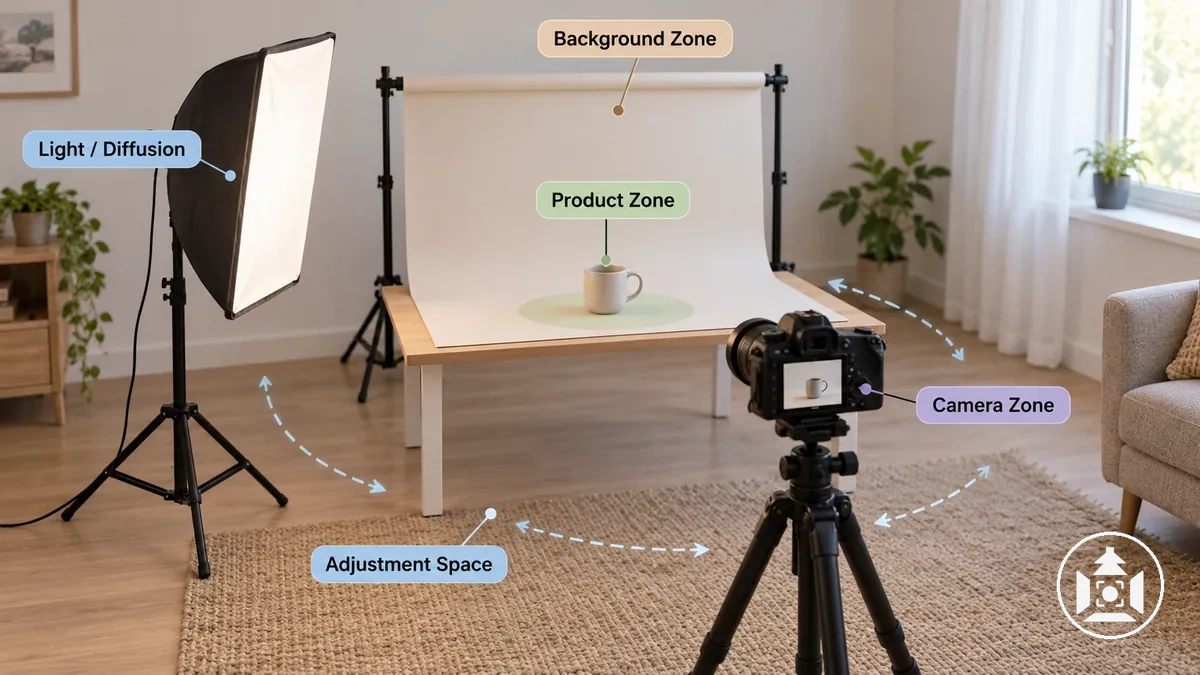
- Product: allow clearance behind and beside the product position so it can be placed or adjusted without immediately interfering with the background or light source.
- Background: reserve enough space for the background to extend behind and beyond the intended frame while allowing its position to be adjusted independently.
- Light/Diffusion: leave side clearance for the light source and diffusion so their positions can be adjusted relative to the product without crowding the subject or intended framing.
- Camera: allow enough working distance at the camera position for stable framing and small positional adjustments without requiring the product, background, or light to move with it.
Build the Setup With Only the Essential Equipment
An essential home product photography setup is defined by the functions it fulfills, not by a fixed collection of gear.
The minimum is limited equipment that reliably provides image capture, stability, product support, light control and modification, and a clean background; each function can be fulfilled by simple household or photographic equipment when it suits the product and shooting space.
A camera or phone fulfils the image-capture function, while a stable support stabilises the device to support sharpness and consistent framing during capture.
The choice of capture device is separate from the rest of the minimal setup, so smartphone versus camera photography can be considered according to the required image and workflow rather than as a reason to change every other setup function.
The table maps each setup function to a minimum solution, a practical substitute, and the implication of fulfilling that function.
| Setup function | Minimum solution | Practical substitute | Implication |
|---|---|---|---|
| Image capture | Camera or phone capable of producing the required framing | Another available camera or phone that fulfils the same capture need | Provides the image capture needed for the shot |
| Device stability | Stable support for the camera or phone | A secure, level household surface that holds the device in position | Supports sharpness and consistent framing by reducing device movement during capture |
| Product support | Stable surface or support suited to the product | A clean table, shelf, or other secure household surface | Keeps the product positioned for the intended framing |
| Light control | Controllable light source | Usable window light when its direction and availability can be controlled for the shoot | Provides light that can be positioned or managed around the product |
| Light modification | Diffusion or reflector when the light needs modification | A suitable plain translucent or reflective household material | Diffusion can soften harsh light, while a reflector can redirect available light |
| Background | Clean background large enough to cover the intended frame | Plain paper, board, fabric, or a clean wall when it provides sufficient coverage | Keeps unwanted surroundings outside the required framing |
Light control, light modification, product support, and background coverage are functional requirements rather than instructions to use particular gear.
A light source can be controlled or modified with diffusion or a reflector when the lighting condition calls for it, while the product support needs to hold the subject securely and the background needs sufficient coverage for clean framing.
The image shows how these functions can operate together in a simple home setup without prescribing a particular equipment kit.
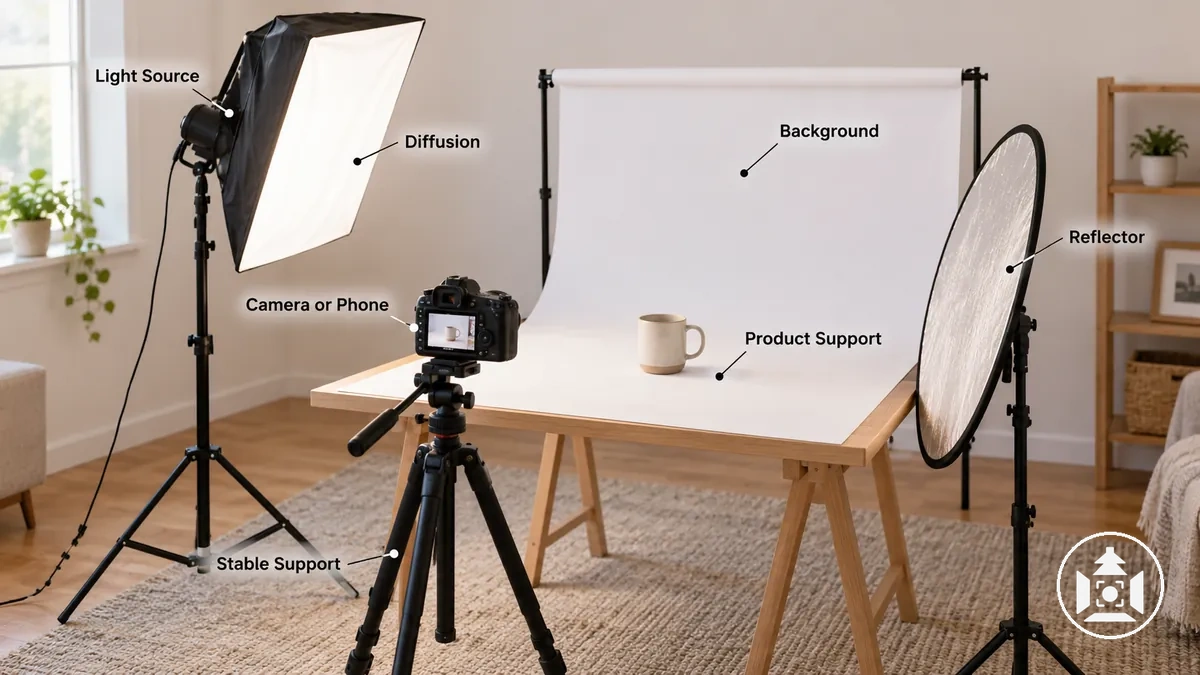
The setup is sufficient when every required function is covered and the components can be assembled, adjusted, and used repeatedly for the intended product.
More detailed arrangement choices belong to the broader product photography setup, while this minimum-function model separates essential roles from optional equipment.
Stabilise the Product and the Camera or Phone
Both the camera or phone and the product need stable support so avoidable movement does not shift framing, focus, or alignment during a shot set.
Stabilising the imaging device reduces camera shake, while secure product support helps maintain the product position and repeatability between frames.
The image labels both sources of avoidable movement: the imaging device on stable support and the product secured on a level surface.
It shows how keeping both positions steady supports consistent alignment without implying that a tripod is required.
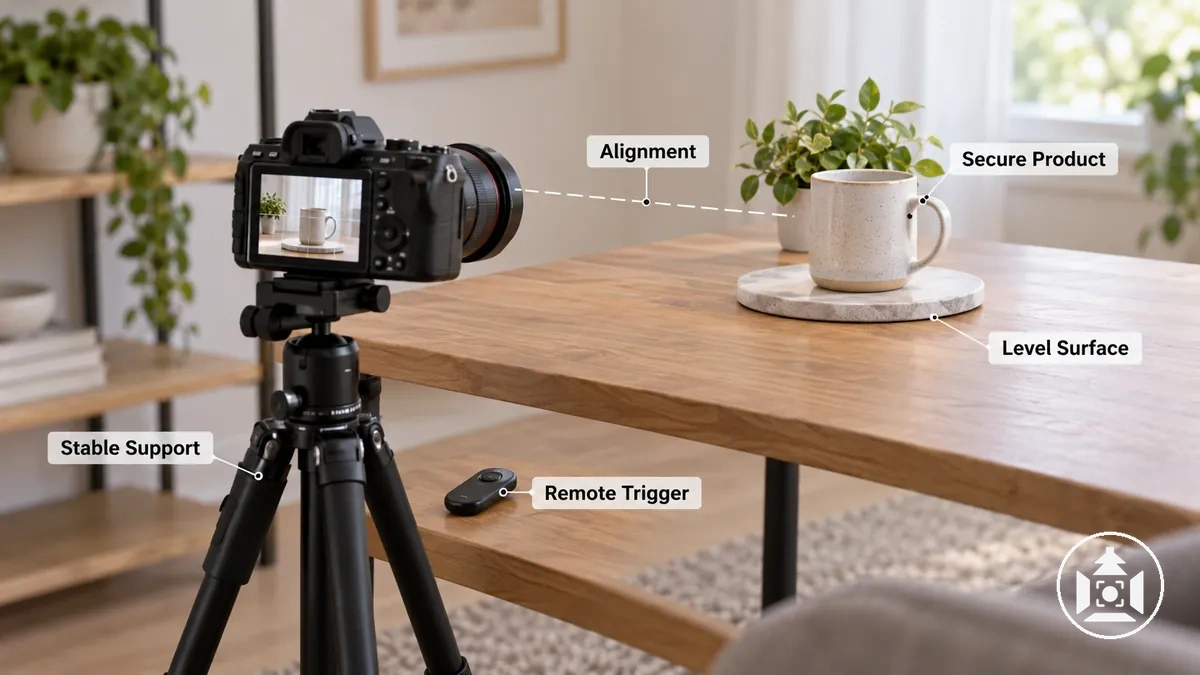
- Support the camera or phone: place the device on a stable support that holds the intended position and reduces camera shake during capture, supporting sharpness and consistent framing.
- Support the product: use a level surface and secure a product that can roll, lean, or shift so its position and alignment remain consistent between frames.
- Reduce movement when triggering: when available, use a timer or remote trigger to reduce movement caused by touching the camera or phone at the moment of capture.
- Check both positions: before continuing the shot set, confirm that neither the device nor the product has shifted from the intended framing and alignment; this supports repeatability and fewer accidental shifts between frames.
Create Soft, Controllable Light in the Room
Soft, controllable product lighting comes from managing the apparent source size, diffusion, direction, and spill rather than choosing one universally superior light type.
A larger apparent source size relative to the product generally creates softer shadow transitions, while diffusion can soften the light reaching the product; controllability also requires keeping the light direction and unwanted spill predictable.
Change one main variable at a time so the effect on the product remains interpretable before making the next adjustment.
Use this sequence to establish the light and then evaluate its effect on shadow, contrast, glare, and consistency.
- Choose the light source: start with the available source whose direction and output can remain sufficiently consistent for the shot set.
- Soften or enlarge it: increase the apparent source size relative to the product or place suitable diffusion between the light source and product when harder shadow transitions or concentrated reflections need softening.
- Set distance and direction: position the source so its distance and direction produce usable illumination across the product, then evaluate how those variables change shadow placement, contrast, and visible reflections.
- Control fill and spill: use a reflector or another simple fill surface when more light is needed on the darker side, or a dark surface as negative fill when reducing reflected light improves contrast; limit unwanted spill when it changes the product or background illumination.
- Evaluate the result: inspect the product for shadow hardness, glare, reflections, and frame-to-frame consistency, then adjust one variable and check the result again.
Room conditions and product surfaces change how these adjustments appear in the photograph: nearby light-coloured surfaces can return spill toward the product, while glossy or reflective surfaces can make the light source more visible as reflections or glare.
A compact one-light arrangement can be sufficient when its diffusion, position, spill, and surrounding reflections can be controlled for the product, but the same arrangement is not suitable for every product size, surface, or room.
Broader methods for lighting product photos belong outside this local room-control method; here, the final check is whether the shadows, glare, and illumination remain consistent enough for the required shot set.
Use a Simple Temporary Background
A temporary product photography background is usable when it provides enough coverage for the intended frame, has a clean and visually suitable surface, and stays stable during the shot set.
It should extend far enough behind and around the product to keep unintended edges, supports, and surrounding room details outside the framing, while a seamless transition behind the product can reduce distracting lines where horizontal and vertical surfaces meet.
Material matters only insofar as it provides the required coverage, surface cleanliness, texture, reflectivity, and secure placement.
Paper, card, foam board, or fabric can each function as a temporary background when its physical and visual properties suit the product and intended frame; colour can be neutral or intentionally chosen rather than universally white.
Evaluate the background by how well these attributes support clean framing rather than by whether the material simply fills the area behind the product.
- Width and height: the background should cover the entire area visible behind and around the product in the intended frame, without exposing unintended edges or supports.
- Seamless transition: where the background continues from beneath to behind the product, a smooth transition can keep a hard rear crease or horizon line from becoming an unwanted part of the image.
- Surface cleanliness: use a background surface without visible dust, marks, wrinkles, or other unwanted features that would become part of the photographed field.
- Colour and texture: choose a colour that serves the intended image, and keep unwanted texture low when surface detail would distract from the product.
- Reflectivity: consider how the background reflects the light source; a more reflective surface can make glare or reflected light more noticeable and may require a different position relative to the product or light.
- Secure placement: position the background so it stays stable throughout the required shots, helping preserve consistent framing and surface placement.
Texture and reflectivity can change how glare and shadow appear around the product, so a background surface that works in one lighting position may need repositioning when those effects become distracting.
The useful temporary background is the one that provides controlled coverage, suitable surface behaviour, and secure placement for the required photograph, regardless of the material used.
Adapt the Setup for Small, Shared, or Temporary Spaces
A small room, shared space, and temporary setup create different constraints because the available footprint, persistence of the setup, and degree of environmental control are not the same.
The practical adaptation should follow the dominant constraint instead of forcing one home-studio arrangement into every situation.
The comparison below separates each space constraint from its practical adaptation and trade-off rather than comparing equipment.
In a small room, limited clearance constrains camera position, light control, and movement around the product, so the setup usually needs a smaller footprint and tighter placement.
In a shared space, interruption and reset risk matter more because the area may need to return to another use, reducing persistence and making repeatability harder if positions are not easy to restore.
| Situation | Main constraint | Practical adaptation | Trade-off |
|---|---|---|---|
| Small room | Limited footprint and clearance around the product, camera, and light | Keep the working arrangement compact and prioritise only the positions needed for framing and controllable light | Less room for repositioning can make fine adjustments more constrained |
| Shared space | Interruption and the need to clear or reset the area for other activities | Use a setup that can be reset from consistent reference positions and moved without disturbing more parts than necessary | Repeated setup and teardown can reduce consistency when positions are not reproduced accurately |
| Temporary setup | Setup speed, storage limits, and lack of permanent positions | Use a portable setup whose parts can be assembled, stored, and returned to repeatable positions | Faster packing and smaller storage requirements can limit how much equipment remains pre-positioned between shoots |
Light availability can change which adaptation is practical in any of these situations.
If the available light is difficult to control or changes during the shoot, the balance between footprint, setup time, and repeatability may shift, so natural versus artificial lighting should be considered according to the room conditions and the consistency required.
Storage limits also matter more in a temporary setup because every additional part must be packed away and positioned again later.
The useful choice is the one that addresses the main operational constraint: reduce footprint when clearance is the problem, simplify reset when interruption is the problem, and favour a portable setup when storage and temporary assembly are the problem.
The same room can therefore require a different setup depending on how long it remains available, how often it is interrupted, and how consistently positions can be reproduced.
Reduce the Setup Footprint Without Crowding the Product
Reducing the setup footprint is useful only while enough product clearance remains for framing, camera distance, light shaping, background coverage, and access for adjustment.
A compact setup should free space without forcing the product, camera, background, or light so close together that stability or control is compromised.
Each space-saving priority reduces occupied area differently, so check every adjustment against framing and light control.
A smaller support surface can free space when it still supports the product securely, while vertical space can reduce the horizontal footprint when suitable background or modifier functions can move upward.
A movable or collapsible modifier can save space, but moving it closer to the product may change light spread or reflections; similarly, wall proximity can free floor area but may increase reflections or limit access.
In a small tabletop setup, shifting a support or modifier to one side or upward can release working space without pushing the product into the background or reducing the camera distance needed for the intended framing.
Preserve functional clearance and control rather than minimizing the occupied area at all costs.
- Reduce the support surface first: use only as much tabletop or product-support area as the subject needs while preserving stability and product clearance.
- Use vertical space: position suitable background or support elements upward when doing so reduces horizontal footprint without interfering with framing or access.
- Use a movable or collapsible modifier: reduce its occupied space when it can still provide the required light shaping, then recheck light spread and reflections after repositioning it.
- Use wall proximity selectively: place parts nearer a wall only when reflections, background coverage, access, and adjustment remain controllable.
Control Light Spill and Reflections From Nearby Walls and Objects
Light spill and reflection from nearby walls, ceilings, furniture, or other objects can alter product brightness, contrast, glare, or colour when those surfaces return light toward the shooting area.
An unexpected bright patch, colour cast, flattened contrast, or unwanted reflection is therefore a signal to test nearby light paths, not proof of a single cause.
Test one suspected light path at a time so the visible change can be associated with that test.
A bright patch or glare may suggest reflection from a nearby wall or object, a colour cast may indicate coloured reflected light, and flattened contrast may indicate extra spill filling darker areas; light reaching the background can similarly suggest spill beyond the intended product area.
Because the product surface itself can also create or reveal reflections, isolate the room contribution by temporarily moving, blocking, or repositioning one suspected nearby source and observing whether the symptom changes.
- Bright patch or glare: identify a nearby wall or object that could be returning the light, block or reposition that one surface relative to the light path, and check whether the bright area changes; if it does, keep the surface or light position where the unwanted reflection is reduced.
- Colour cast: inspect nearby coloured walls or objects that may be contributing reflected light, temporarily block or move one suspected surface, and compare the product colour before and after the test; reposition or block that source when the cast decreases under the changed condition.
- Flattened contrast: check whether light spill or room bounce is adding unwanted fill to the darker side of the product, block one suspected path, and observe whether the intended contrast returns; retain the block or reposition the contributing surface or light when the test supports that path.
- Light on the background or an unwanted product reflection: isolate whether the light is spilling directly toward the background, reflecting from a nearby object, or appearing because of the product surface itself; change one suspected path and observe the result before repositioning the light, product, background, or nearby object.
Apply a correction only after the test produces a relevant visible change.
Block the supported spill path, reposition the contributing surface or light, or alter their relative position while keeping the rest of the setup unchanged for the next check.
If the symptom remains when the suspected room path is blocked or moved, test another nearby source or consider whether the product surface itself is producing the visible reflection.
Confirmation comes from changing one variable and observing a repeatable change in the symptom.
Keep Portable Parts Easy to Position and Remove
Portable setup parts are useful when they can be positioned and removed quickly without sacrificing stability or repeatable placement.
Portability therefore depends on both transport and storage characteristics, such as being collapsible, and on whether each part can be deployed securely and returned to a consistent position.
Evaluate movable parts by how they fold, position, lock, store, and fit into the temporary shooting area rather than by low weight alone.
Cable or stand management should keep necessary connections and supports controlled when parts are moved or removed, while secure locking should keep the deployed position stable during the shoot.
A fast-folding background is useful only if it remains smooth and stable after deployment, and a small storage footprint is useful when packing the part does not make the next setup difficult to recreate.
Position marks or simple setup notes can record where key parts were placed so repeatable placement is easier when the arrangement is rebuilt.
Useful portability is ultimately defined by stable, repeatable deployment and rebuildability rather than low weight alone.
- Collapsibility: a collapsible part improves setup speed and storage only when folding and reopening it preserves the shape, surface, or function required during the shoot.
- Positioning: a portable part should be easy to place and adjust within the available area while still reaching the position required for its shooting function.
- Secure locking and stability: movable supports, stands, or foldable components should remain stable in their working position and use their available locking mechanism securely where one is provided.
- Cable or stand management: cables and supporting parts should remain controlled during positioning and removal so they do not unnecessarily obstruct access or disturb the arrangement.
- Storage footprint: folded or disassembled parts should fit the available storage space in a form that can be retrieved and redeployed without unnecessary reconstruction.
- Repeatable placement: position marks or simple setup notes can record useful locations and orientations, making the temporary arrangement easier to recreate consistently after removal.
Photograph the Product Once the Home Setup Is Stable
Once the stable setup provides controlled framing, light, and background, photograph the product from that baseline and make only intentional changes during the shot set.
Establish the product position, camera position, light placement, and background before continuing so accidental movement does not become part of the shooting process.
Keep the product position fixed when the required view does not call for repositioning, and preserve the camera height and camera distance while the framing is meant to remain consistent.
Keep the light placement stable while the intended illumination remains suitable, and leave the background in its established position while it continues to cover the required frame.
Treat these positions as a repeatable baseline, verify them after an adjustment, and continue shooting from the controlled starting point rather than allowing unrelated variables to drift.
An intentional change is justified when a required angle, composition, or product feature cannot be photographed correctly from the existing baseline.
Change the specific variable needed for that image, verify the resulting framing and light, and keep the remaining baseline variables controlled through the rest of the shot set.
Prepare and Position the Product Before Shooting
Before the first frame, inspect the product so its condition is accurately represented, remove visible dust from the photographed surface, choose the intended orientation, and place it in a physically secure position.
Preparing the product in this order reduces avoidable repositioning once framing and alignment have been established.
- Inspect and clean: examine the surfaces that will face the camera and remove visible dust or unintended loose debris without altering the product.
- Check product condition: verify that parts, surfaces, labels, and other visible features are in the condition that should be represented before establishing the product position.
- Choose the orientation: turn the product so the intended face or feature is presented to the camera; this orientation establishes the starting relationship between the product, framing, and shadow placement.
- Set the product position: centre or deliberately offset the product according to the intended view, then check its alignment within the framing before continuing.
- Secure the product: use an appropriate support when the product can roll, lean, or shift, keeping the support outside the visible frame unless it is intentionally part of the photograph.
- Verify the frame: inspect the final product placement for alignment, stability, visible support, and unintended debris, and correct any of these before the first exposure.
Once the product is clean, correctly oriented, securely supported, and visually checked, preserve that placement until an intentional change is required for another view.
This keeps product orientation and support controlled so later frames do not require repeated corrections caused by accidental shifts.
Set Framing and Exposure Before Moving the Product
After the physical setup is stable, establish the framing, focus point, and exposure before moving the product.
Keep the camera or phone position, frame boundaries, and angle fixed while you test the image so the first usable frame becomes a controlled baseline rather than a set of universal numeric settings.
Use a test image to evaluate what the current setup actually produces.
Check that the intended product area stays inside the framing, the focus point falls on the required detail, and the exposure retains usable highlight detail and shadow detail for the product surface and lighting condition.
Because exposure choices depend on the device, light level, support stability, and product surface, judge the visible result rather than applying one fixed setting to every setup.
- Set the frame: position the camera or phone, establish the intended angle, and check the frame boundaries around the product and background.
- Set the focus point: place focus on the product detail that needs to appear clear, then inspect the resulting sharpness in the test frame.
- Evaluate exposure: adjust exposure only as needed to preserve the intended highlight detail and shadow detail under the current lighting conditions.
- Capture a test image: review the test image for framing, focus, and exposure before changing the product position.
- Adjust one variable at a time: if the test frame needs correction, change only the relevant variable, capture another test image, and compare the visible result before making another adjustment.
Once the test image produces the required framing, focus, and exposure, treat those conditions as the confirmed baseline for the shot set.
Move the product only when the next required view or feature calls for an intentional change.
Capture the Required Images in a Consistent Sequence
Capture the required views in a planned shot sequence while the stable setup variables remain unchanged unless a particular view requires a deliberate adjustment.
Starting with a baseline view and following a repeatable capture order helps track coverage while reducing missed views and accidental variation between images.
The sequence should preserve camera height, camera distance, product placement, light position, and background position where those variables are intended to remain consistent.
Use the planned views to track what has already been captured and what still needs coverage before substantially changing the setup.
- Plan the required views: identify the views needed for this product and establish their capture order before shooting; check that the sequence reflects the product and purpose rather than a universal shot list.
- Capture the baseline view: photograph the starting view with the established camera height, camera distance, product placement, light position, and background; check that it matches the intended framing before continuing.
- Continue through the shot sequence: capture each planned view in order while maintaining the variables that do not need to change; check each completed view against the remaining coverage.
- Change deliberately when required: if another view requires the product, camera, or another setup variable to move, change only what that view requires and keep the remaining variables stable where appropriate; check the resulting frame before proceeding.
- Confirm coverage: compare the completed images with the required views and capture any missing view before dismantling or substantially changing the setup.
For example, a product that requires front, side, and rear views can be photographed in that planned order while the camera height, camera distance, light position, and background remain fixed where the framing permits; the product placement or orientation changes deliberately for each required view.
This repeatable order makes missing coverage easier to identify before the setup changes.
Broader methods for keeping a home setup consistent belong outside this local shot-sequence process, so confirm coverage before dismantling or substantially changing the setup.
Check the Images Before Dismantling the Setup
Do not dismantle the setup until the required views and obvious recapture triggers have been checked.
Keeping the setup intact during this pre-breakdown review allows a missing shot or visible shooting problem to be corrected without rebuilding the arrangement.
Use the final shooting check to decide whether the setup can be dismantled or should remain in place for correction and recapture.
The checklist covers required-view coverage and obvious changes in product position, setup, glare, shadow, or presentation rather than detailed technical image-quality criteria.
- Required views complete? Confirm that every required view has been captured; if a planned view is missing, recapture it before dismantling the setup.
- Product position still correct? Check for an accidental change in product position that affects the intended presentation; correct the position and recapture the affected frame when necessary.
- Setup still in the intended position? Confirm that the camera, light, background, or product support has not shifted in a way that visibly changes the intended result; restore the affected part and recapture when required.
- No obvious glare or shadow problem? Check for unintended glare or shadow that visibly obscures or distracts from the product; correct the physical setup and recapture the affected image when necessary.
- Product presentation still acceptable? Confirm that no obvious physical-shooting issue has changed how the product is presented; correct the issue and recapture before dismantling if needed.
If any checklist item fails, keep the setup intact and correct or recapture while the arrangement remains reproducible.
Dismantle the setup only after required-view coverage and obvious recapture triggers pass this go/no-go review.
Verify Sharpness, Exposure, Colour, Framing, and Background Cleanliness
Each captured image should pass five quality checks before the physical setup disappears: intended sharpness, usable exposure, plausible colour, planned framing, and background cleanliness.
These checks determine whether the visible result supports keeping the image or whether the setup should remain available for correction and recapture.
Evaluate each criterion by an observable pass signal and respond immediately when it fails.
Technical capture criteria cover sharpness, exposure, and colour, while presentation criteria cover framing and background cleanliness.
The checklist keeps the decision at the capture stage rather than assuming a visible problem can be corrected later.
- Sharpness: Pass when the intended focus area appears sharp enough to show the required product detail. If that area appears unintentionally soft or blurred, check the physical setup and focus, then recapture before dismantling it.
- Exposure: Pass when the image retains the highlight detail and shadow detail needed to represent the product under the chosen lighting conditions. If important product detail is visibly lost in excessively bright or dark areas, adjust the capture setup or exposure and recapture.
- Colour: Pass when the product colour looks plausible under the chosen light and no obvious unwanted colour shift is visible. Screen appearance alone does not prove colour accuracy, so if the colour remains uncertain, check the lighting conditions and make a controlled recapture rather than assuming the displayed result is definitive.
- Framing: Pass when the captured image matches the planned framing and includes the intended product area without unintended cropping or distracting surrounding elements. If the framing differs from the planned view, correct the product or camera position as appropriate and recapture.
- Background cleanliness: Pass when the visible background is free from distracting marks, folds, unintended edges, or tonal problems that interfere with the product presentation. If a visible defect comes from the physical background or its lighting, correct that condition and recapture the image.
A failed check should lead to a relevant setup adjustment or recapture while the physical arrangement is still available.
Because display appearance cannot by itself establish exact colour accuracy, use a controlled test or recapture when colour or another capture-stage result remains uncertain.