
Common Ecommerce Product Photography Mistakes
Common ecommerce product photography mistakes include poor lighting or exposure, distracting backgrounds and composition, missed focus, inaccurate colour or excessive editing, inconsistent image sets, and inadequate product preparation or shot coverage. Correct the cause before the symptom: verify the visible defect, fix capture or presentation conditions at their source, re-shoot when critical product information was not captured reliably, and use editing only when the source file still contains accurate detail. Before publishing, check every required view for product accuracy, clarity, coverage, and consistency.
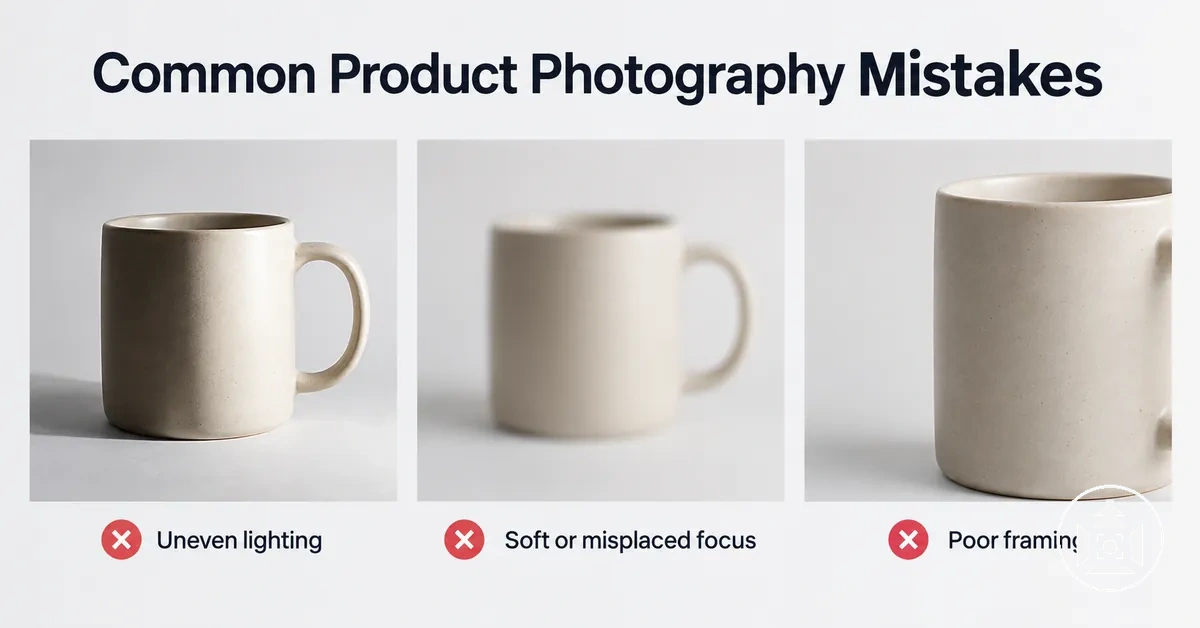
Quick diagnostic: signal → check → correction
Start with what is visible in the finished product image. Match the signal to the affected attribute, verify the likely source, then choose the correction that preserves the most reliable product information.
Lighting & exposure
- Signal
- Harsh shadows, glare, uneven brightness, or lost shadow/highlight detail.
- Check
- Light direction and quality, exposure, and whether important product detail remains recorded.
- Correct
- Adjust lighting or exposure at capture; edit only where usable source detail remains.
Background, props & composition
- Signal
- Clutter, weak product prominence, misleading scale, or awkward framing.
- Check
- Whether the surroundings clarify the product's size, shape, features, or use without competing for attention.
- Correct
- Simplify or subordinate distracting elements, then reframe around the intended product view.
Focus & sharpness
- Signal
- Soft labels, edges, texture, or other critical product detail.
- Check
- Focal-point placement, movement patterns, edge detail, text/texture legibility, and depth-of-field adequacy.
- Correct
- Correct focus, stability, or depth of field; re-shoot if critical detail was not captured reliably.
Colour & editing
- Signal
- Colour casts, oversaturation, excessive contrast, smoothing, or retouching that changes visible product attributes.
- Check
- Colour and tonal appearance against the product or another reliable reference, and whether the source file still contains faithful detail.
- Correct
- Limit edits to recorded information; do not invent missing colour, texture, form, or detail.
Image-set consistency
- Signal
- Unexplained changes in lighting, framing, scale, background, crop, or colour across comparable views.
- Check
- Whether the changed attribute serves a different shot purpose or is accidental drift.
- Correct
- Keep shared attributes repeatable across comparable views while allowing purposeful variation for detail or contextual shots.
Preparation & shot coverage
- Signal
- Dust, fingerprints, distorted presentation, missing features, missing views, or absent scale/context cues.
- Check
- Whether the full image set makes the product information required for the listing understandable and verifiable.
- Correct
- Prepare the product before capture and add or re-shoot views that are needed to communicate relevant product attributes.
A visible defect does not prove one cause. Confirm the mechanism before choosing a correction, especially when editing would have to replace information that the camera did not record.
These errors can reduce image quality by obscuring useful detail or making product images less faithful to the product being represented. Similar-looking defects can have different sources, so diagnosis should stay tied to the affected image attribute and the evidence available in the capture.
Table of Contents
How Product Photography Mistakes Show Up in Ecommerce Images
Visible product-image defects are diagnostic signals, not proof of one cause.
A signal such as lost detail, an unwanted colour cast, or uneven presentation identifies the image attribute that needs inspection before a likely cause can be assigned.
The useful distinction is between what the product image visibly shows and what still needs to be checked.
Compare the affected image attribute with relevant evidence such as lighting and exposure, focus and sharpness, colour fidelity, background and framing, consistency across the image set, or whether the required product views are adequately covered.

- Uneven brightness, harsh shadows, or glare: the signal suggests a lighting or exposure issue, but the visible result alone does not identify which one. Check where highlights, shadows, and retained product detail change before deciding which local error category fits.
- Soft or unclear product detail: reduced sharpness can indicate a focus problem, movement, or insufficient captured detail. Check whether softness affects the whole product or only particular areas to distinguish the likely source.
- Distracting background or awkward framing: the visible defect concerns presentation when surrounding elements compete with the product or framing obscures useful product information. Check the product boundary, surrounding elements, and framing before interpreting the likely cause.
- Colour that appears unfaithful or carries a cast: the signal concerns colour fidelity, but capture conditions and editing can produce similar-looking results. Check whether the colour shift appears consistently across the product and related images before identifying the likely source.
- Images that do not look like one coherent set: changes in framing, background, scale, lighting, or editing suggest a consistency issue when the variation has no product-related purpose. Check comparable images across the set to distinguish intentional variation from inconsistent treatment.
- Important product information is not visually covered: the signal may indicate incomplete coverage rather than a defect within one image. Check whether the image set provides the views or visible details needed to represent the product before assigning the problem to another image attribute.
Similar-looking defects can require different interpretations: softness may relate to focus or movement, while an apparent colour problem may originate during capture or editing.
The next decision is to match the observed signal and differentiating check to the local error category that best fits the available evidence.
Lighting and Exposure Problems
Lighting and exposure problems become visible when light quality, shadows, glare, or exposure loss obscures the detail needed to represent a product accurately.
Harsh light can make surface texture and edge definition harder to read, while underexposure can conceal shadow detail and overexposure can leave bright areas without useful highlight detail.
Light-quality errors are different from exposure-state errors: harsh or uneven illumination changes how form and texture appear, while underexposure or overexposure reduces usable detail in darker or brighter areas.
Reflective products may show glare prominently, dark products may lose detail in shadows, and light or textured surfaces may make highlight loss or uneven illumination easier to notice; broader product photography lighting methods sit beyond this mistake-recognition step.
The following states organise common lighting and exposure errors by their visible consequence, recognition cue, and brief corrective direction, so the image can be checked without assuming one setup is universally correct.
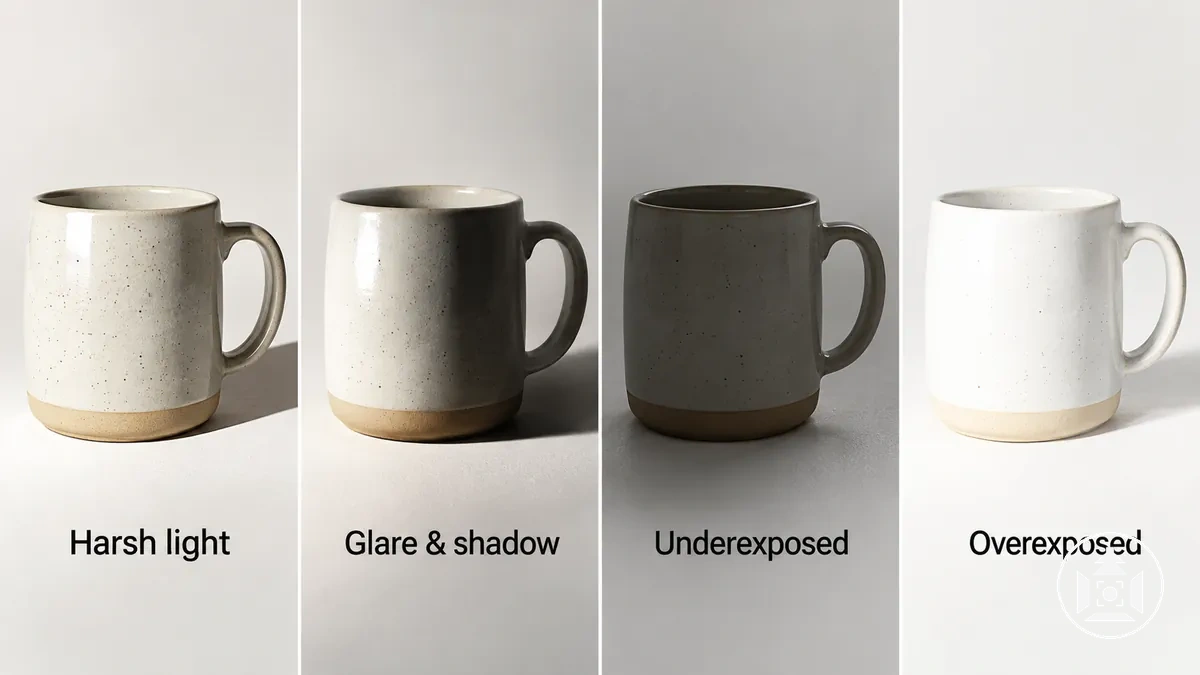
- Harsh direct light: hard-edged shadows or abrupt bright areas can reduce readable texture and make surface transitions look severe. Recognise it by strong local contrast and sharply defined shadow edges; the corrective direction is to moderate the light quality or direction rather than treating the appearance as an editing problem alone.
- Heavy shadows or glare: deep shadows can obscure product features, while glare can mask detail on reflective surfaces. Check whether important edges, texture, or surface information disappears specifically in dark or reflective areas; the corrective direction is to change how light reaches or reflects from the product.
- Lighting that is too flat: very even illumination can leave a three-dimensional product with weak visual separation between surfaces. Look for reduced form, texture, or edge definition despite retained overall detail; the corrective direction is to introduce enough directional variation to reveal shape without assuming one lighting arrangement suits every product.
- Underexposure: an exposure state that is too dark can conceal shadow detail and reduce visibility, especially on dark products. Check whether important darker areas contain little distinguishable texture or form; the corrective direction is to obtain a brighter usable exposure while retaining important highlights.
- Overexposure: an exposure state that is too bright can eliminate useful highlight detail, particularly on light, glossy, or reflective surfaces. Check whether bright product areas have lost visible texture or surface variation; the corrective direction is to reduce excessive exposure at capture because detail that is already clipped is not reliably restored through editing.
Background, Props, and Composition Problems
Background, props, and composition become problems when surrounding or spatial choices compete with the product instead of helping communicate its size, shape, features, or use.
Distracting clutter, weak product prominence, misleading scale, or poorly controlled framing can make the product harder to interpret even when the product itself is clearly photographed.
Supportive context gives relevant information without obscuring the product, while distracting context pulls visual attention away from it or makes scale and purpose ambiguous.
A prop can clarify product use when its relationship is relevant, but the same prop can become clutter when it dominates the scene; broader choices about product photography backgrounds depend on the product and shot purpose rather than one universal background rule.
The following problems separate common scene and composition choices from their visible consequences, recognition cues, and local correction directions.
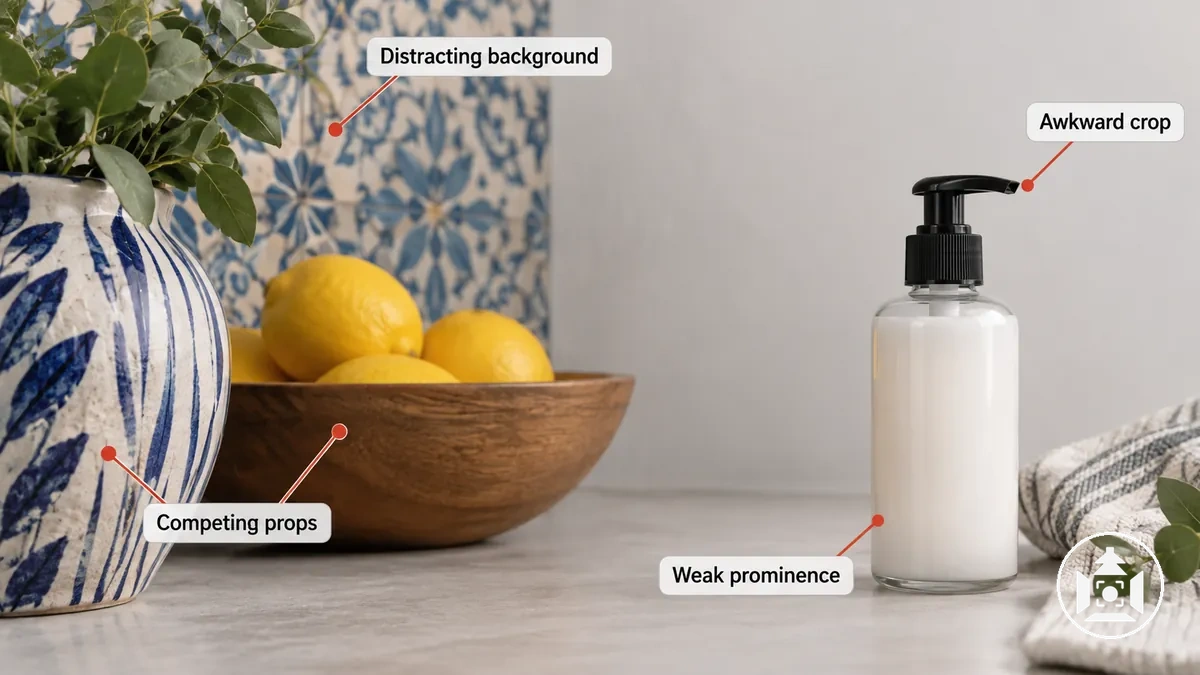
- Distracting background: strong patterns, competing objects, or visually dominant surroundings can reduce product prominence. Check whether attention is drawn away from the product or its edges become difficult to distinguish; the corrective direction is to simplify or subordinate the competing background elements.
- Unnecessary props: props can create clutter or confuse product use when their relationship to the product is unclear. Check whether each prop adds relevant context or competes for attention; the corrective direction is to retain only contextual elements that support interpretation.
- Awkward framing or crop: a crop that cuts through important product features or places the subject awkwardly can obscure shape and useful visual information. Check whether the complete features needed for that shot remain legible within the framing; the corrective direction is to adjust subject position or crop boundaries.
- Poorly used negative space: excessive empty space can make the product appear visually weak, while insufficient negative space can make the composition feel crowded. Check the balance between subject size, surrounding space, and the intended shot purpose; the corrective direction is to adjust spacing without assuming every product requires identical framing.
- Weak product prominence: the product can lose visual hierarchy when surrounding elements have similar or greater visual weight. Check whether the product remains the clear primary subject at first inspection; the corrective direction is to reduce competition or strengthen the product's position within the composition.
- Misleading scale: surrounding objects or framing can make product size difficult to interpret when they provide an unclear or inappropriate visual reference. Check whether contextual elements clarify relative scale rather than create ambiguity; the corrective direction is to use spatial context that supports an accurate reading of the product.
Focus and Sharpness Problems
Weak sharpness can reflect missed focus, movement softness, or insufficient depth of field, so these states should be distinguished before correction.
The first check is whether the intended focal point carries the critical product detail, because softness elsewhere does not by itself identify the source of the problem.
For product inspection, focal point, edge detail, text or texture legibility, movement patterns, and depth-of-field adequacy provide different recognition cues.
When these checks point to a broader blur problem, blurry ecommerce product photos require deeper diagnosis; ordinary sharpening can increase apparent edge contrast, but it cannot reliably recreate product detail that was not captured.
The criteria below distinguish focus placement, movement softness, and depth-of-field limitations so critical product detail can be checked against the intended view.
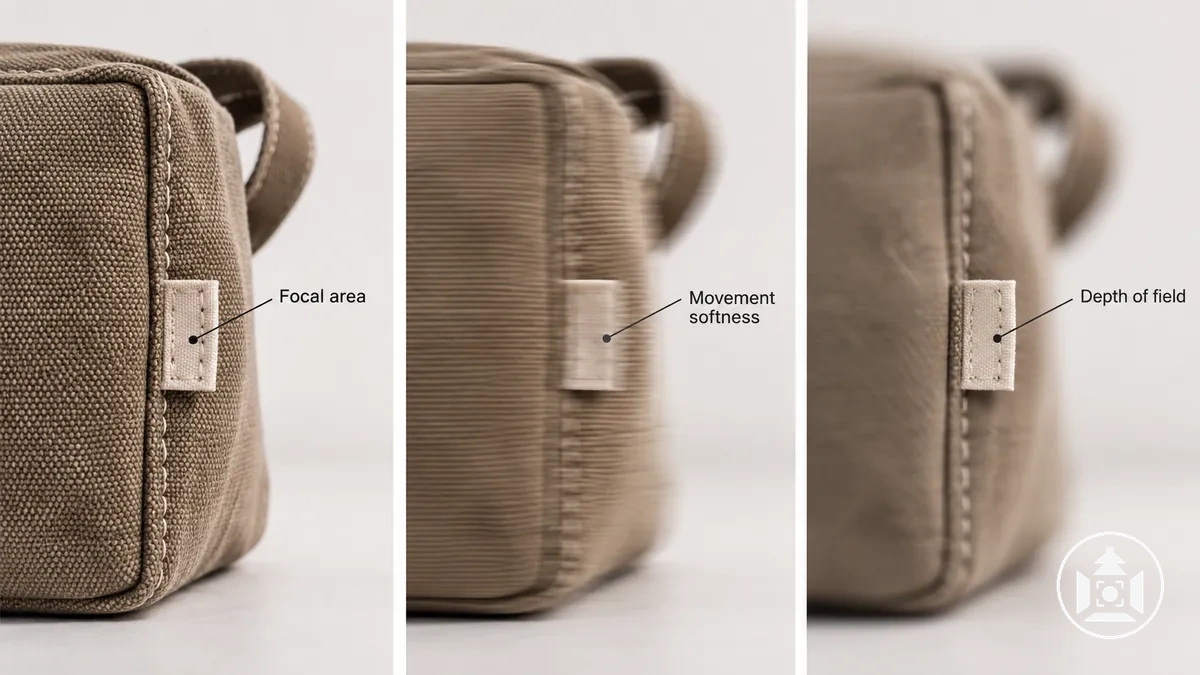
- Focal point: check whether the intended product feature carries the clearest focus. If a nearby area is sharper than the label, seam, edge, or other critical feature, the pattern suggests missed focus rather than proving that all softness has the same cause.
- Edge detail: inspect important product boundaries for local softness or directional blur. A displaced sharp area suggests a focus-placement issue, while similar directional softness across multiple edges can suggest camera or subject movement.
- Text and texture legibility: check whether labels, fine seams, surface texture, or other inspection details remain distinguishable where the image needs to communicate them. Lost legibility indicates that the captured sharpness is insufficient for that intended product view, regardless of whether another part of the image appears sharper.
- Movement softness: check whether fine details and edges show a similar directional smear rather than one plane simply falling outside focus. That pattern can indicate movement during capture and calls for a movement or stability check rather than assuming the focal point alone is wrong.
- Depth of field: compare near and far product detail with the area that the intended view needs to keep legible. If the focal area is sharp but required detail progressively softens in front of or behind it, the depth of field may be insufficient for that view rather than the focal point being misplaced.
Colour and Editing Problems
Colour and editing problems become misleading when colour accuracy or post-processing no longer preserves a credible product appearance.
A colour cast can shift apparent colour, while excessive saturation, contrast, smoothing, or retouching can exaggerate or suppress texture, detail, shadows, and material characteristics that the image is meant to communicate.
Faithful correction addresses a captured colour or tonal state without unnecessarily altering the product's visible characteristics, whereas excessive editing changes those characteristics beyond correction.
Capture-related shifts from lighting or exposure need to be distinguished from processing choices before judging product image colour accuracy; colour perception can also vary with lighting, capture conditions, and the display used to view the image.
The following errors organise common colour and editing problems by the product attribute they distort, the visible consequence, and the local corrective direction.
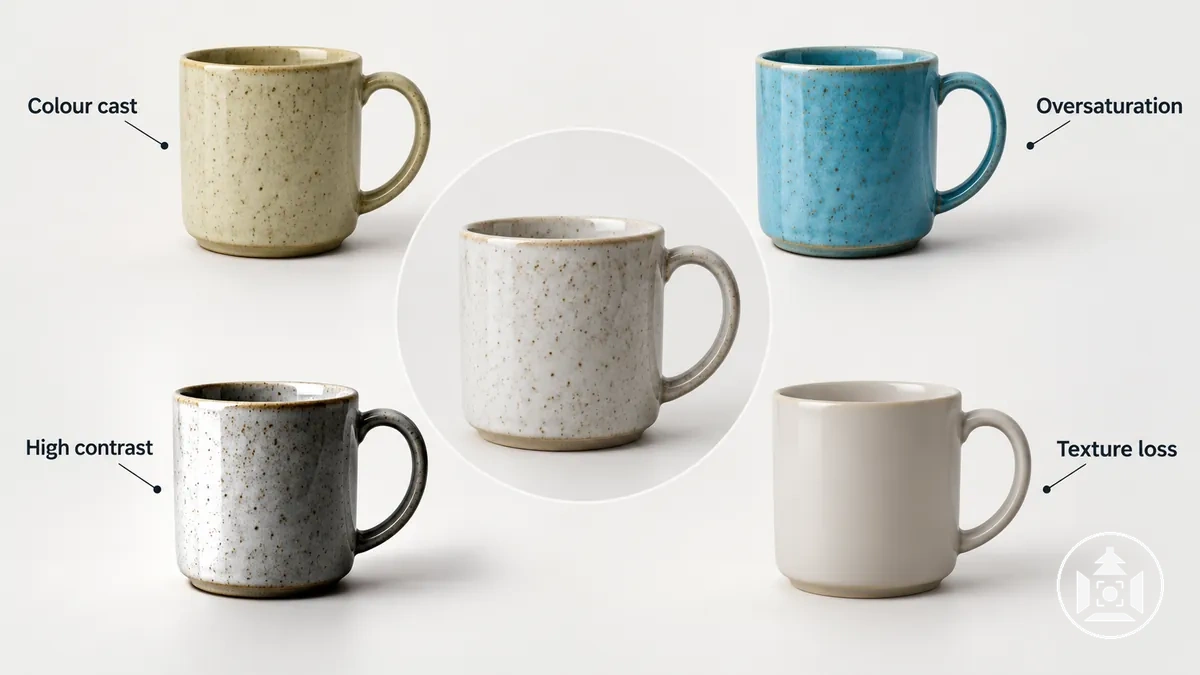
- Colour cast: an unwanted colour shift can make the product appearance seem warmer, cooler, or otherwise different from a credible reference. Check whether neutral or known product areas share the same shift; the corrective direction is to address the colour balance while checking whether the shift originated during capture or processing.
- Oversaturation: excessive saturation can exaggerate product colours and reduce fidelity to the intended product appearance. Check whether colours appear unnaturally intense or subtle colour differences are compressed; the corrective direction is to reduce the excessive colour adjustment rather than treating stronger colour as inherently more accurate.
- Excessive contrast: overly strong contrast can suppress shadow detail or make bright and dark transitions appear harsher than the product warrants. Check whether useful surface texture or material detail becomes difficult to distinguish in highlights or shadows; the corrective direction is to moderate the tonal adjustment while retaining useful detail.
- Over-smoothing: excessive smoothing can suppress texture that communicates material, finish, seams, or surface detail. Check whether areas that should retain visible texture appear unnaturally uniform; the corrective direction is to limit smoothing where it changes relevant product characteristics.
- Unrealistic shadows: inconsistent or excessive shadow changes can alter how the product's form and placement are perceived. Check whether shadows appear visually disconnected from the product or inconsistent with the surrounding illumination; the corrective direction is to keep shadow treatment consistent with a credible product appearance.
- Uneven retouching: local retouching can create inconsistent texture, colour, or tonal transitions across otherwise comparable product areas. Check for abrupt changes in surface detail or finish that are not explained by the product itself; the corrective direction is to keep corrections restrained and consistent with the visible product characteristics.
Inconsistency Across a Product Image Set
Image-set inconsistency exists when otherwise comparable product images vary in lighting, framing, scale, background, colour treatment, crop, or another repeatable attribute without an informational reason.
Individual images can therefore be acceptable on their own while accidental variation reduces consistency and makes comparison across the image set less coherent.
Repeatability is evaluated by checking the same attributes across comparable images rather than expecting every image to be identical.
The criteria below compare repeated capture and processing attributes to identify whether a changed state supports the shot purpose or introduces accidental drift that weakens product comparison and catalogue coherence.
- Lighting: compare the direction, intensity, and overall character of illumination across equivalent product views. Unexplained changes can make surface detail, form, or product appearance differ between otherwise comparable images, while deliberate lighting variation may be appropriate when a different shot purpose requires it.
- Framing: check whether comparable products occupy a similar visual position and are framed according to the same intended view. Accidental shifts in product position or framing can weaken repeatability and make side-by-side comparison less direct.
- Scale: compare the apparent product size across images intended to perform the same catalogue function. A changed scale supports consistency when the shot purpose calls for a closer detail or wider contextual view, but unexplained scale changes can make comparable images feel disconnected.
- Background: check whether background treatment remains consistent where images share the same purpose. An unexplained change in background tone, context, or visual weight can interrupt catalogue coherence even when the product itself remains clearly visible.
- Crop: compare crop boundaries and the amount of surrounding space across equivalent views. Accidental crop variation can change product prominence and alignment within the image set, whereas a purposeful detail shot can justify a different crop.
- Colour treatment: compare colour and tonal treatment across images that should represent the product under equivalent conditions. Unexplained processing differences can make product appearance vary across the set and reduce confidence that comparable images are being presented consistently.
Controlled variation has an informational purpose, such as changing scale or crop for a detail view, while accidental drift changes a repeatable attribute without helping the viewer interpret the product.
The relevant test is whether each variation supports the intended shot purpose and comparison task rather than whether every image looks identical.
When unexplained differences persist across comparable views, inconsistent ecommerce product photos require the dedicated consistency workflow rather than further diagnosis within this section.
Product Preparation and Shot Coverage Problems
Product preparation problems occur when the product reaches capture with visible faults such as dust, fingerprints, or a distorted shape, while shot coverage problems occur when the image set fails to show important details, useful views, scale cues, or relevant product use.
The first type can misrepresent a visible product attribute; the second creates an information gap because a needed attribute or view cannot be verified from the available images.
Adequate product preparation and shot coverage depend on the product's shape, detail, variation, and information needs rather than a fixed number of images. Coverage is adequate when the required views collectively make the relevant sides, features, form, finish, scale cues where needed, and intended use understandable for the listing.
The grouped mistakes below separate product-readiness faults from coverage gaps and identify the product information each one obscures, hides, or fails to show, without prescribing a complete shot-planning workflow.
- Preparation defect — dust or fingerprints: visible dust, smudges, or fingerprints can obscure surface finish and fine detail or make marks appear to be part of the product. Check whether surfaces that should communicate material, texture, or finish are visibly contaminated; the corrective direction is to make those surfaces presentation-ready before capture.
- Preparation defect — misshapen or poorly arranged product: an item that is unintentionally compressed, folded, twisted, or arranged incorrectly can misrepresent its normal shape or form. Check whether the photographed arrangement accurately shows the product attribute the view is intended to communicate; the corrective direction is to restore the intended presentation before capture.
- Preparation defect — hidden important details: poor product readiness or arrangement can conceal seams, controls, openings, fasteners, labels, or other important details. Check whether the relevant feature is visible enough to verify; the corrective direction is to arrange the product so the required detail can be shown clearly.
- Coverage gap — too few useful views: shot coverage is insufficient when the available views omit a side, feature, variation, or form that is necessary to answer a relevant product question. Check whether multiple views collectively show the attributes that cannot be understood from one view; the required coverage depends on the product's shape, detail, variation, and information needs rather than a mandatory shot count.
- Coverage gap — missing scale cues: products whose size is difficult to interpret visually may need a relevant scale cue or contextual reference. Check whether the available images let the viewer interpret size adequately for the product and shot purpose; where they do not, the corrective direction is to add an appropriate visual reference without implying that every product requires one.
- Coverage gap — product use or form not shown: some products are harder to understand when the image set omits how they are held, worn, opened, assembled, positioned, or otherwise used. Check whether product use or three-dimensional form is necessary to answer an information need that static views leave unresolved; if so, the corrective direction is to include a view that makes that relationship visible.
Why Common Product Photography Mistakes Happen
Common product photography mistakes often come from unstable shooting conditions, missed verification during capture, or inappropriate reliance on post-processing rather than one isolated cause.
Each condition can affect a different image attribute and increase the likelihood of an error state, while the same visible defect may result from more than one mechanism.
- Unstable shooting conditions: variation in the shooting environment can change lighting, product position, camera stability, or other capture conditions between images. When a relevant condition changes unintentionally, the affected image attribute can vary and produce an error state such as inconsistent appearance, lost detail, or softness.
- Skipped verification: a missed check during capture can allow a defect in focus, exposure, product presentation, or view coverage to persist into the finished image set. The missed verification is a contributing factor because it allows an existing capture problem to remain unnoticed rather than necessarily creating the defect itself.
- Post-processing dependence: post-processing can adjust captured image information, but relying on it to compensate for information that was not adequately recorded can leave the underlying limitation unresolved. When important source information is absent or obscured at capture, later correction may change appearance without restoring the missing product detail.
A direct cause produces the relevant image change through the condition itself, whereas a contributing condition increases the likelihood that a defect appears or persists without being its sole source.
For example, a soft product edge can follow movement during capture, while missed verification can allow that softness to remain unnoticed; the contributing factor affects persistence rather than necessarily causing the original softness.
Different causal paths can produce similar visible defects because separate mechanisms may affect the same image attribute.
A loss of visible detail, for example, can follow the capture condition itself or become harder to interpret after unsuitable post-processing, so the error state alone does not establish its source.
The mechanism should therefore be confirmed before a correction is selected.
Unplanned or Inconsistent Shooting Conditions
Uncontrolled changes in shooting conditions matter when they alter comparable product-image attributes in ways that cannot be reproduced intentionally.
Changes in the shooting environment can affect exposure, colour, focus, framing, or other image states, although several conditions may contribute to the same visible variation.
Intentional adjustments differ from uncontrolled changes because they serve a defined image purpose and can be repeated when the same result is required.
Variation in camera settings for product photos can contribute to a changed image state alongside changes in light, position, or the surrounding environment; the relevant criterion is whether the conditions and resulting variation are deliberate and reproducible rather than whether every variable remains fixed.
The criteria below connect changing shooting conditions to the image attributes and visible consequences that can indicate uncontrolled drift.
- Light direction: an unplanned change in where light reaches the product can alter highlight position, shadow direction, surface modelling, and visible texture. If comparable images show unexplained changes in these attributes, light direction is one shooting condition that may have drifted.
- Light intensity: changing light intensity can alter the amount of light contributing to capture and can contribute to exposure variation when other relevant conditions do not compensate for the change. Comparable images that become unexpectedly brighter or darker therefore warrant checking whether light intensity changed intentionally or without repeatable control.
- Ambient light: uncontrolled ambient light can mix with the intended illumination and contribute to changes in brightness or colour appearance. Variation that follows changing daylight or another surrounding light source indicates that ambient light may be altering the intended shooting environment.
- Camera and product position: changes in camera position or product position alter their spatial relationship and can change framing, apparent perspective, or which product surfaces are visible. When equivalent views no longer align as intended, either position may have changed without a reproducible reason.
- Background placement: moving the background relative to the product, camera, or light can change how much of it appears in frame and how its illumination is represented. Unplanned background placement changes can therefore contribute to visible background or framing variation even when the product itself has not moved.
- Camera settings and repeatability: changes to relevant camera settings can alter image attributes such as exposure, focus behaviour, or recorded appearance depending on which setting changes and the surrounding conditions. An intentional change is not inherently an error; it becomes uncontrolled variation when the intended image state cannot be reproduced for a comparable capture.
Skipping Lighting, Focus, Background, and Composition Checks
Skipped quality checks allow detectable defects to persist through later captures and potentially across an entire product set.
When lighting, focus, background, composition, framing, or crop conditions are not verified, a small defect can remain unnoticed and be repeated instead of being identified while the relevant image state can still be reviewed.
Each check should be tied to the specific defect it is intended to detect before further shooting or publishing.
The criteria below connect each verification point to the defect class it can reveal and therefore show where a missed check can allow an error to persist; verification is the causal break point because detection creates the opportunity to respond, although it does not guarantee that every downstream defect or rework will be avoided.
- Lighting check: inspect illumination and exposure for unintended brightness, shadow, highlight, or glare states. Skipping this check can allow a visible lighting or exposure defect to remain undetected and recur in subsequent images captured under the same conditions.
- Focus check: inspect whether the intended focal detail has sufficient sharpness and legibility for the product view. A missed focus verification can allow soft or incorrectly emphasised product detail to persist through additional captures.
- Background check: inspect the background for distractions, unintended objects, marks, or competing visual elements. Without this review, a background defect can remain present across multiple images before it is noticed downstream.
- Product-position check: inspect whether the product position presents the intended shape, orientation, and visible features for the shot. Skipping the check can allow an unintended position to be repeated across the product set.
- Framing check: inspect whether the intended product features remain appropriately represented within the frame. A missed framing check can allow poor subject placement or missing visual information to continue into later images.
- Crop-safety check: inspect whether important product edges, features, or contextual information are at risk of being excluded by the intended crop. If this verification is omitted, a repeated framing pattern can leave necessary product information outside the usable image area.
- Composition check: inspect whether the product remains the clear primary subject and whether surrounding elements support rather than compete with it. Skipping this review can allow distracting or poorly balanced composition choices to persist across otherwise usable images.
Relying on Editing to Correct Capture Problems
Post-processing can correct some recorded states in a capture problem, but it cannot reliably restore accurate product source information that was never captured.
A modest exposure or colour adjustment may be recoverable when usable detail remains in the source file, whereas severe blur, clipped detail, or an obstructed feature can leave the information needed for a faithful correction unavailable.
The relevant contrast is between a recoverable adjustment to recorded information and an information-losing capture failure that editing would have to replace with an invented appearance.
File quality and defect severity affect how much correction remains possible, so the criteria below separate each capture state by its available source information and editing limitation; when critical product detail, texture, or other source information is missing or unreliable, the safer corrective direction is a re-shoot rather than relying on post-processing to reconstruct it.
- Modest exposure or colour adjustment: when the source file retains usable product detail and the required correction does not materially alter product appearance, the recorded state may be recoverable through post-processing. The correction should remain bounded by product fidelity rather than being used to disguise missing source information.
- Severe blur: when blur leaves important edges, labels, or texture without reliable captured detail, post-processing cannot reliably restore the missing product information. If the required feature cannot be represented faithfully from the source file, a re-shoot is the safer corrective direction.
- Clipped detail: when an important highlight or shadow contains no usable recorded detail, editing cannot reliably recover the product information absent from that area. If the lost information is necessary to represent the product accurately, the capture problem requires a new exposure or re-shoot rather than stronger correction.
- Obstructed product feature: when another object, the product arrangement, or the chosen view hides an important feature, the source file does not contain a visible record of that feature. Post-processing should not be treated as a reliable way to reconstruct its accurate appearance; a new capture that shows the feature is the appropriate direction when that information is required.
- Lighting that misrepresents texture: when the captured lighting suppresses or distorts the visible texture needed to communicate material appearance, editing may adjust recorded tone or contrast but cannot reliably supply texture information that the capture did not reveal. If the source information is insufficient for a faithful product appearance, correcting the lighting at capture and re-shooting is safer than manufacturing detail in post-processing.
How to Correct Product Photography Mistakes
Correcting product photography mistakes should start with the visible symptom and verification of the likely cause before any corrective action is chosen.
Diagnose first, then choose the correction that preserves the most reliable product information and product accuracy rather than making random adjustments.
- Identify the symptom: define the observable problem in the product image without assuming that the symptom identifies its cause. Keep the observation tied to the affected product information so the next check tests a specific problem.
- Verify the likely cause: check the capture conditions and relevant image information to determine whether the suspected cause is supported. If the check does not support it, test another plausible cause before applying a correction.
- Correct at the source when possible: when the source problem can still be changed and the required product information can be captured correctly, apply the source correction before producing further affected images.
- Re-shoot when necessary: if important product information is missing, unreliable, or cannot be represented accurately from the existing capture, use a re-shoot rather than attempting to manufacture the missing detail.
- Apply limited post-processing: when the necessary information was captured and the defect is a recoverable recorded state, use post-processing only to the extent needed for a faithful correction. The adjustment should preserve product accuracy rather than conceal an unresolved capture problem.
- Confirm the corrected result: perform a final verification against the product information the image is intended to communicate. Confirm that the original symptom has been resolved without introducing another misleading change before treating the correction as complete.
Source correction, re-shooting, and limited post-processing are different corrective branches because the appropriate action depends on what reliable information remains in the capture.
A source problem that can still be corrected should be addressed at capture, missing or unreliable product information may require a re-shoot, and post-processing is appropriate only when the recorded information supports a faithful adjustment.
Verification is the final check that the corrective action resolved the identified problem while preserving product accuracy.
The corrected result should satisfy the intended product-information need without assuming that one fix works for every cause.
Correct Capture Problems at Their Source
Once a capture-stage cause has been verified, adjust the relevant source variable before relying on post-processing.
The symptom and confirming check should determine whether the corrective direction involves light, exposure, focus, product position, framing, or background control rather than several unrelated changes.
- Confirm the capture-stage cause: connect the visible symptom to the suspected source condition and use a relevant check to verify that the condition plausibly explains the affected image attribute before making an adjustment.
- Adjust one relevant variable: change the source condition supported by the diagnosis, such as light, exposure, focus, product position, framing, or background placement. Keep other relevant conditions stable where practical so the effect of that adjustment remains testable.
- Make a verification capture: produce a test image after the controlled adjustment rather than assuming the source correction worked. The verification capture provides a comparable result for checking the attribute affected by the original symptom.
- Inspect the affected attribute: compare the test result with the identified defect and determine whether the changed variable improved the relevant product information without introducing another misleading change.
- Retain or revise the change: retain the adjustment when the verification result supports it; if the symptom remains, revise the suspected cause or corrective direction and test another controlled change rather than changing several variables at once.
Changing several variables together can make it difficult to determine which capture adjustment affected the result, so source correction should keep the diagnosed condition and test result connected.
Use the verification capture to confirm whether the source change addressed the identified defect while preserving accurate product information; if it did not, revise the suspected cause or adjustment rather than treating the change as confirmed.
Re-shoot When Product Accuracy or Detail Is Compromised
A re-shoot is appropriate when the existing source file no longer contains trustworthy product information needed to represent the product accurately.
If missed focus, clipped detail, a hidden feature, misleading reflection, or another capture fault leaves an important product attribute unavailable or unreliable, a new capture is usually safer than attempting to invent the missing appearance.
An information-losing defect differs from a recoverable adjustment because usable source information is no longer available for faithful correction.
Minor exposure, crop, colour, or similar adjustments may remain recoverable when the source file still represents the relevant product detail accurately; the re-shoot decision therefore depends on source-file quality and on how important the affected attribute is to product accuracy.
The criteria below distinguish recoverable cases from defects that compromise the reliability of the current image.
- Unrecoverable missed focus: when missed focus leaves important product detail, text, edges, or texture without reliable recorded information, the source file cannot represent that attribute faithfully. If the affected detail matters to the product view, the condition warrants a re-shoot rather than relying on sharpening to recreate it.
- Clipped important detail: when a highlight or shadow contains no usable recorded information in an area that communicates a relevant product attribute, that detail cannot be represented reliably from the current file. A new capture is appropriate when the lost information is important to product appearance or verification.
- Hidden or blocked feature: when product arrangement, another object, or the chosen view obscures an important feature, the source file lacks a visible record of that feature. If the hidden feature is necessary to understand or verify the product, a re-shoot is required to capture it rather than reconstructing its appearance.
- Misleading reflection: a reflection that hides, distorts, or visually changes an important surface can compromise the reliability of the represented finish, colour, shape, or detail. If the underlying product attribute remains visible and trustworthy, limited correction may be possible; if the reflection prevents accurate interpretation, a new capture is the safer corrective direction.
- Severe shape or preparation fault: a product photographed in an unintended shape, arrangement, or presentation state can leave the source file representing the wrong physical condition. When the affected form or structure is important to product accuracy and cannot be corrected without inventing appearance, the condition warrants a new capture.
- Editing would require invented appearance: if correcting the source file would require creating product detail, texture, form, or other information that was not reliably recorded, the file is not trustworthy enough for that correction. In that case, a re-shoot preserves product accuracy more reliably than substituting generated or inferred appearance for captured information.
Keep Editing Corrections Accurate and Consistent
Editing should improve recorded image states while preserving credible product appearance and product fidelity.
A correction is appropriate only when it adjusts information already present in the capture without materially changing the product's colour, texture, form, or other attributes that the image is meant to represent.
Verification should compare colour fidelity, exposure balance, crop consistency, background cleanup, texture, realistic shadows, and repeatable treatment against the captured product or another reliable reference.
The acceptable correction range depends on the product material, source quality, and reference conditions, so consistency means applying comparable treatment where the same attribute and purpose are shared rather than forcing identical editing on every image.
The criteria below evaluate whether each edit remains faithful and repeatable across related images.
- Colour fidelity: adjust colour only within the range needed to represent the product credibly from the available source information. Verify the result against the product or a reliable colour reference, while recognising that appearance can still vary with viewing conditions and displays.
- Exposure balance: adjust recorded brightness and tonal balance only while important product detail remains faithful to the captured product. Verify that the correction improves visibility without suppressing relevant shadow detail, clipping useful highlights, or changing how the product surface is interpreted.
- Crop consistency: use crop adjustments to support comparable framing and product prominence across related images without removing information needed for the intended view. Verify that the crop retains important product edges, features, and context rather than applying an identical crop where different views have different information needs.
- Background cleanup: remove distracting marks or unintended background elements only when the edit does not alter the product boundary, shape, or surrounding cues needed for accurate interpretation. Verify the cleaned area against the source image so the product remains unchanged.
- Texture retention: smoothing, sharpening, or local correction should retain material texture and fine product detail rather than replacing them with an artificial surface appearance. Verify areas such as fabric, grain, seams, finishes, or edges against the captured product or reliable reference before accepting the edit.
- Realistic shadows: shadow correction should preserve a believable relationship between the product, surface, and recorded lighting rather than changing apparent product form or placement. Verify that edited shadows remain consistent with the product geometry and surrounding illumination.
- Repeatable treatment: related images should receive consistent correction where they share the same product attribute, capture purpose, and reference condition. Repeatable treatment does not require identical adjustments; verification should confirm that differences in editing are justified by differences in the source image or product information rather than uncontrolled processing variation.
How to Prevent Product Photography Errors Before Publishing
Pre-publishing verification should check individual-image accuracy and consistency across the complete product image set.
The purpose is to catch unresolved capture, presentation, coverage, colour, or editing issues before the images go live, without assuming that a passed check guarantees universal quality.
Each final check should correspond to an observable condition and a specific review action when that condition fails.
What counts as acceptable still depends on the product, shot purpose, and publishing requirements, so verification should flag the relevant issue and return it to the appropriate capture, coverage, or editing review rather than applying a generic correction.
- Product readiness: verify that the product is clean, correctly arranged, and presented in the intended physical state. If dust, fingerprints, distortion, or poor preparation changes the visible product condition, return the image for preparation review and correction.
- Visible detail: confirm that the product detail required for the shot is clear enough to inspect, including important edges, texture, labels, controls, or features. If necessary detail is soft, hidden, or unreadable, flag the image for focus, positioning, or capture review.
- Lighting: check that illumination reveals the product without unintended glare, heavy shadow, uneven light, or loss of relevant surface information. If lighting obscures or misrepresents an important attribute, return the image for lighting review.
- Exposure: verify that important highlight and shadow areas retain usable product information. If exposure leaves relevant detail too dark, too bright, or unavailable, flag the image for capture or exposure correction.
- Framing and crop: confirm that the intended product features remain inside the usable frame and that the crop supports the shot purpose. If important edges, features, or context are excluded or awkwardly positioned, return the image for framing or crop review.
- Background: check that the background is free from unintended distractions, marks, objects, or visual competition that interferes with the product. If the background reduces product clarity or introduces unwanted elements, flag it for capture or background-cleanup review.
- Shot coverage: verify that the image set contains the views and visible information needed to represent the product for its intended purpose. If an important side, feature, form, scale cue, or use state remains unrepresented, return the set for coverage review.
- Colour: confirm that colour remains credible relative to the captured product or another reliable reference. If the image shows an unexplained cast, excessive saturation, or inconsistent colour treatment, flag it for colour verification and correction.
- Editing restraint: check that post-processing has not removed meaningful texture, altered product form, created unrealistic shadows, or introduced local manipulation that changes material appearance. If the edit changes product information rather than correcting the recorded image state, return it for editing review.
- Set-level consistency: compare related images for repeatable treatment of framing, scale, background, lighting, colour, crop, and editing where those attributes should be comparable. If unexplained variation appears across the product set, flag the affected images for consistency review rather than assuming every image must be edited identically.
Any failed check should return the image or set to the relevant capture, shot coverage, or editing issue for review before publishing.
Check Product Preparation, Lighting, Focus, Framing, and Background
Capture-stage verification should confirm that product preparation is complete, lighting and exposure preserve usable detail, critical focus is clear, framing supports the intended view, and the background does not create avoidable distraction.
These checks protect product legibility and identify correctable capture conditions before final delivery.
Each verification should test an observable condition rather than impose one setup on every product or shot purpose.
Framing and product prominence should support the intended view without expanding into the broader product photo composition process; justified variation is acceptable when it preserves the product as the clear subject and keeps important physical detail visible.
- Product preparation: confirm that the product is clean, correctly shaped, and arranged in the intended physical state. If dust, fingerprints, distortion, or poor arrangement changes how the product appears, flag it for preparation correction before delivery.
- Lighting and exposure: verify that lighting reveals the product and that exposure retains the visible detail required for the shot. If glare, heavy shadow, uneven illumination, or brightness loss obscures an important attribute, return the image for capture review.
- Critical focus: inspect the product detail that must be legible in the intended view and confirm that focus represents it clearly. If the required edge, label, texture, seam, or feature is noticeably soft, flag the image for focus review.
- Product prominence: confirm that the product remains the clear primary subject relative to surrounding space and objects. If other elements compete with or obscure the product, correct the relevant capture or placement issue unless the shot purpose intentionally requires that context.
- Framing: verify that the product position and frame include the features needed for the intended image purpose. If important areas are awkwardly placed or excluded, return the image for framing review rather than assuming one framing pattern fits every shot.
- Crop safety: confirm that important product edges, features, and contextual information remain safely within the usable image area. If the intended crop would remove required physical detail, revise the framing or crop before final delivery.
- Background: inspect the background for unintended marks, objects, visual competition, or distractions that reduce product clarity. If a background element interferes with the subject or hides relevant detail, flag it for capture or cleanup review while preserving justified context required by the shot.
Check Shot Coverage, Colour, Editing, and Image-Set Consistency
The completed image set should be verified for both information completeness and coherent treatment across its required views.
Shot coverage should provide the product information needed for the intended purpose, while colour fidelity, editing restraint, and presentation should remain appropriately consistent across related images.
Intentional differences in scale, context, crop, or presentation are acceptable when a view has a different informational purpose; unexplained differences require review rather than being treated as deliberate variation.
Each verification point should therefore test whether the observed state supports product interpretation and comparison without imposing a fixed shot count or requiring every image to look identical.
- Shot coverage: confirm that the available views collectively show the product information required for its intended presentation, including relevant sides, features, form, or use states. If important product detail cannot be understood from the existing views, return the image set for coverage review.
- Scale cues and context: verify that a scale cue or contextual view is present when product size or use would otherwise be difficult to interpret. If scale is already clear from the product and shot purpose, additional context is not required; if it remains ambiguous, flag the set for coverage review.
- Colour fidelity: compare related views to confirm that product colour remains credible and does not shift without a capture or contextual reason. Unexplained differences in colour treatment require verification against the product or another reliable reference before the set is accepted.
- Editing restraint: inspect whether post-processing preserves product texture, form, detail, and material appearance across the image set. If an edit changes product information or hides an unresolved capture problem, return the affected image for editing or capture review rather than adding further processing.
- Crop consistency: confirm that comparable views use crop and product scale in a repeatable way where they serve the same purpose. A deliberate close-up or contextual view may differ appropriately, but unexplained crop changes that weaken comparison should be reviewed.
- Background consistency: verify that background treatment remains coherent across images intended to perform the same catalogue function. Purposeful contextual images may use a different background, while unexplained changes in tone, placement, or visual weight require review.
- Repeatable presentation: compare framing, product prominence, colour treatment, background, and editing across equivalent views to confirm that similar images remain visually coherent. If differences do not support a clear informational purpose, trace the discrepancy back to capture, shot coverage, or editing rather than masking it with additional processing.
Unresolved discrepancies should be traced to their capture, coverage, or editing source before final delivery.