
How to Keep Ecommerce Product Photos Consistent Across a Catalog
Keep ecommerce product photos consistent by defining a documented reference standard, reproducing the same controllable inputs for comparable products, and checking each finished batch against that standard. Consistency means a repeatable visual system, not identical settings for every product; change framing, lighting response, or another controlled attribute only when a documented product or category condition justifies it.

Consistency decision framework
Use these rules to decide what must stay fixed, what may vary, when an image passes, and where to correct drift across a product catalog.
- Reference baseline
- For comparable products, keep the approved lighting character, camera viewpoint, placement and framing logic, background treatment, crop convention, and editing character observable and repeatable.
- Controlled variation
- Change only the control affected by a defined product or category condition, such as dimensions, material, reflectance, or packaging, while keeping unrelated baseline controls stable.
- Batch repeatability
- Use the approved shot list and capture order, reset drift-prone setup variables between products, and compare the first test frame with the active reference before continuing.
- Publish decision
- Pass when every controlled difference is either within the active standard or covered by a documented exception. Fix unexplained deviations before release.
- Drift diagnosis
- Correct the earliest verified stage where the mismatch appears. For a batch-wide change, inspect shared reference, setup, capture, and editing controls before treating individual files.
- Standard evolution
- Create a new baseline only when a change is intentional, repeatable, scoped, and approved; give the revision a distinct version identifier and an effective date or batch.
Working sequence: reference → repeat → compare → diagnose → version. This makes catalog consistency verifiable without forcing unlike products into identical settings.
Catalog consistency is maintained through a repeatable photography process that can be applied across products, shooting batches, and future sessions.
The objective is to keep the recurring visual treatment recognisable while recording justified exceptions, rather than assuming one fixed camera, lighting, framing, or editing setting will suit every product.
A documented reference standard provides the baseline for judging that repeatability.
New ecommerce product photos can then be compared with the same reference to determine whether they follow the intended catalog system or whether a visible difference is an approved product-specific variation.
Table of Contents
Establish a Reference Standard for the Product Catalog
A catalog reference standard is a documented, observable baseline used to plan and check new product images against an agreed visual treatment.
It anchors the catalog to a reference image and documented requirements in a style guide or photography brief rather than an informal preference.
The standard should specify rules that another shoot can reproduce or verify while permitting documented exceptions where a product category requires different treatment.
The reference standard should record the reference image first, then define the product category or categories to which it applies and the visual rules used for comparison.
Those rules should identify the intended lighting character, camera viewpoint, product placement, framing, background treatment, crop convention, and editing character without turning the standard into instructions for performing each technique.
Category scope matters because differences in product dimensions, materials, or presentation can justify an exception to a shared catalog rule.
Recording those exceptions alongside the fixed requirements makes intended variation distinguishable from an undocumented change.
The visual baseline should also be observable in the reference image so the intended relationship between the product, frame, and background can be checked during later shoots.

For example, a photography brief might specify the same background treatment and framing convention for main catalog images within one product category, while permitting a documented framing adjustment for an unusually tall product.
The background and framing convention remain the category rules, while the recorded adjustment becomes an approved exception that can be verified against the reference standard.
Define Which Visual Attributes Must Stay Fixed
Fixed visual attributes should be limited to controls whose uncontrolled variation would visibly break catalog coherence.
Each control must have an observable stable state, while a product category may use a documented exception when the shared rule is not appropriate.
The fixed controls should cover lighting direction and overall exposure character, camera viewpoint, product scale within the frame, framing margins, background treatment, crop convention, and editing character.
The criterion is observable repeatability: for example, repeatable product placement is a usable rule, while asking separate shoots to simply “look similar” does not define a stable state that can be checked.
The criteria below separate these consistency controls from incidental details by linking each control to the visible implication of drift.
The accompanying image provides a visual comparison point for how these fixed attributes affect the appearance of a catalog image.
- Lighting direction: maintain the intended direction and lighting character so changes in highlights and shadows do not signal a different photographic treatment.
- Camera viewpoint: maintain the approved viewing position and perspective so comparable products are not presented from visibly different orientations.
- Product scale: maintain the intended relative size of the product within the frame so composition alone does not make comparable products appear inconsistently scaled.
- Framing margins: maintain the approved spacing around the product so changes in surrounding space do not alter the catalog's visual rhythm.
- Background treatment: maintain the approved background appearance so changes in tone, texture, or treatment do not signal a different catalog system.
- Crop convention: apply the approved crop logic for the relevant product category so product boundaries and surrounding space remain visually comparable.
- Editing character: maintain the approved overall rendering character so changes in contrast, colour treatment, or finish do not create an unintended catalog mismatch.

Define Which Visual Attributes May Vary by Product Category
Consistency does not require every product category to use identical photographic treatment.
Controlled category variation is legitimate when dimensions, material, packaging, or another relevant product characteristic materially changes the appropriate treatment, provided the shared baseline remains recognisable.
A permitted variation should respond to a defined product condition rather than personal preference or an isolated unusual item.
The exception may change framing, product scale, or lighting response where the product characteristic makes the standard treatment unsuitable, while unrelated fixed attributes remain anchored to the shared baseline.
For example, tall versus flat product dimensions may justify different framing because the products occupy the frame differently.
The table maps product conditions to permitted adjustments, the elements that remain stable, and the implication for catalog coherence.
| Product condition | Permitted adjustment | Unchanged baseline | Implication |
|---|---|---|---|
| Tall versus flat dimensions | Category-specific framing or product scale | Background treatment and overall catalog presentation | Different proportions can be accommodated without introducing an unrelated visual treatment. |
| Material with a different reflectance | Controlled lighting response appropriate to the surface | Intended viewpoint, framing logic, and overall catalog character | The material can be represented while the image remains recognisable as part of the shared catalog system. |
| Packaging that materially changes product proportions | Approved variation in placement or framing | Shared background and overall visual treatment | The packaging can be accommodated without turning the exception into a new catalog standard. |
Category-specific variation therefore changes only the control affected by the product condition; the remaining shared baseline continues to provide the comparison point for catalog coherence.
The accompanying image illustrates how different product proportions can use controlled framing while retaining a common catalog treatment.

Standardise the Variables That Control Product Photo Consistency
Standardised photography variables are controllable inputs recorded and coordinated around the approved reference so each shoot starts from a repeatable state rather than being recreated from memory.
Standardisation controls the conditions that shape the visible result while allowing documented adjustments when a product characteristic changes how an input behaves.
The aim is repeatability of the catalog treatment, not identical settings for every product.
The major controlled inputs are lighting conditions and exposure, camera position and camera settings, product placement, background and styling, framing, and the handoff into editing.
Variables that can remain stable for comparable products should be locked to the recorded baseline, while variables affected by dimensions, material, reflectance, or packaging may need a documented adjustment.
For example, camera position can remain fixed when the intended perspective is unchanged, while framing may be adjusted when substantially different product proportions require it.
The table organizes each controlled input by its repeatable state, the condition that can justify adjustment, and its visible consistency effect.
| Controlled input | Repeatable state | Adjustment condition | Visible consistency effect |
|---|---|---|---|
| Lighting conditions | Recorded lighting direction and character | Adjust when product material or reflectance requires a controlled change in lighting response | Keeps highlight and shadow character comparable across similar products |
| Exposure | Recorded exposure and white balance approach | Adjust when product characteristics change the captured tonal or colour response | Limits unintended brightness and colour differences between catalog images |
| Camera position and camera settings | Recorded position, distance, viewpoint, and baseline settings | Adjust when product dimensions or another documented condition requires a different capture state | Keeps perspective and capture treatment comparable where the same presentation is intended |
| Product placement | Repeatable placement relative to the camera and frame | Adjust for materially different dimensions or packaging while retaining the intended presentation logic | Keeps product position visually comparable while accommodating legitimate product differences |
| Background and styling | Recorded background treatment and styling rules | Adjust when an approved product-category condition requires different handling | Keeps the surrounding visual treatment aligned with the catalog baseline |
| Framing | Recorded framing and crop convention | Adjust when product proportions require different spacing or scale within the frame | Keeps composition coherent while accommodating different product proportions |
| Editing | Recorded crop, colour, tonal, and finishing approach | Adjust when captured product characteristics require a documented correction within the catalog standard | Keeps the final visual treatment consistent without obscuring legitimate product differences |
These controls work as one coordinated system: a documented adjustment should be checked against the resulting catalog appearance rather than treated in isolation.
The accompanying diagram illustrates that coordination at a method level; detailed execution belongs within a repeatable product photography setup rather than this section.

Keep Lighting and Exposure Repeatable
Repeatable lighting and exposure require stable controllable lighting conditions followed by a comparison of the first test frame with the reference image.
Record light position, light distance, ambient light, white balance, and exposure so the starting conditions can be reproduced, while allowing a documented adjustment when product reflectance or the environment changes the visible result.
The diagram shows the spatial relationships between the lights, product, background, camera, and shadow direction that should remain stable or be intentionally adjusted.
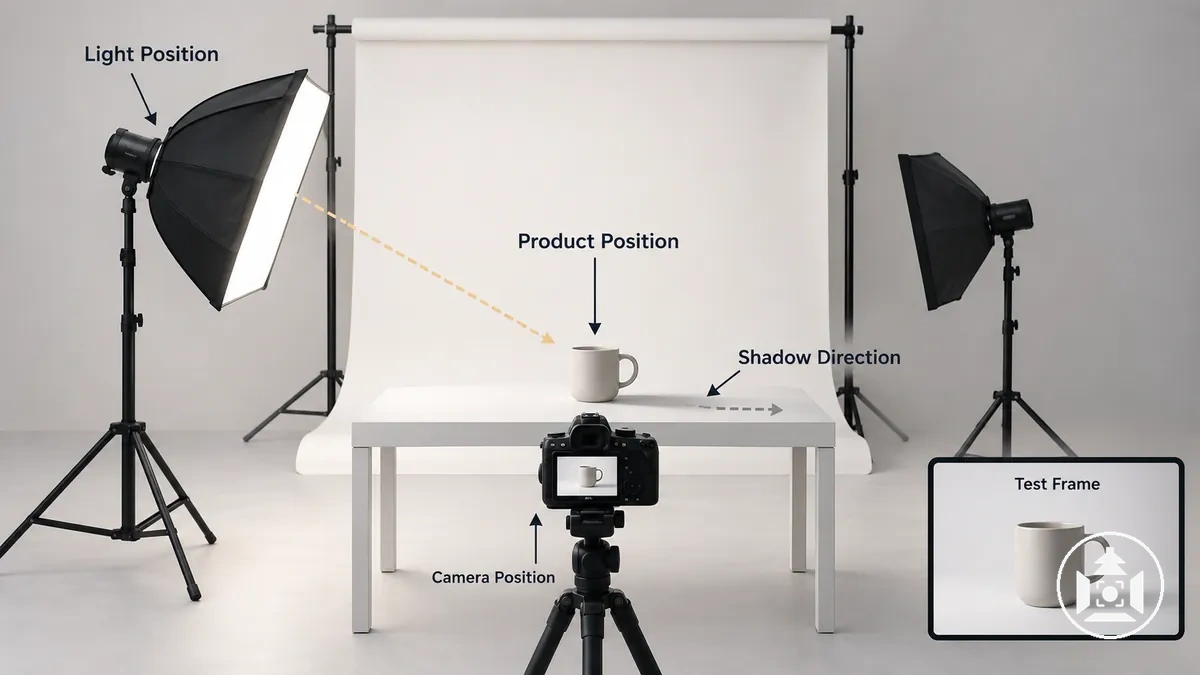
The sequence below is for reducing session-to-session variation, not for selecting a lighting technique.
Work from the physical lighting arrangement through the recorded colour and exposure state, checking the visible result before proceeding.
Overall brightness, colour, and shadow direction are comparison signals rather than proof that any single variable caused a difference.
- Position the lights. Set each light position relative to the product and record the arrangement used for the intended result. Before proceeding, check that the illumination and visible shadow direction correspond with the reference image.
- Set light distance and output. Return each light to its recorded distance and controlled output state. Before proceeding, check the test frame for an unintended difference in overall brightness or shadow character.
- Control ambient light. Keep ambient light in the recorded state where practical, or document an environmental change that requires compensation. Before proceeding, check whether brightness or colour has shifted relative to the reference image.
- Set white balance. Apply the recorded white-balance approach for comparable lighting conditions. Before proceeding, compare the test frame with the reference image for an unintended colour difference.
- Establish exposure. Start from the recorded exposure state and assess the resulting product brightness rather than assuming the same exposure is appropriate for every surface. Before proceeding, adjust and document the exposure or illumination when product reflectance produces a materially different result.
- Verify the first frame. Compare the first test frame with the reference image for overall brightness, colour, illumination, and shadow direction. Continue with the batch only when the intended lighting and exposure result is reproduced or a necessary product-specific adjustment has been documented.
Reflective or unusually light or dark products may need a controlled exposure or lighting adjustment because their reflectance can produce a different recorded brightness under otherwise stable conditions.
Record the product condition and the adjustment rather than treating the changed setting as a new baseline, then verify the resulting test frame against the reference image before photographing the full batch.
Keep Camera Position, Distance and Capture Settings Repeatable
Camera position and capture settings should be recorded and made repeatable because camera geometry influences perspective and product scale, while aperture, shutter speed, ISO, white balance, and focus method influence depth of field, exposure, colour, and focus behaviour.
Record the approved starting state and hold it stable for comparable products, then adjust a value only when a documented product or shooting condition justifies the change.
An unrecorded change in distance or focal length can alter apparent product proportions even when the final crop looks similar.
The criteria below separate physical camera geometry from capture settings because each controls a different part of repeatable image appearance.
Record each control, hold it stable when the intended product presentation is comparable, and adjust it deliberately when a product condition requires a different state.
Compare the resulting perspective, scale, depth of field, exposure, colour, and focus with the intended catalog appearance before continuing.
Detailed selection of consistent camera settings belongs to the camera-settings workflow; here, consistency means controlling the recorded values for repeatable appearance rather than blindly keeping every numeric setting identical.
- Camera geometry: record camera height, angle, distance, focal length or zoom state, and tripod position so changes in perspective and apparent product scale are intentional.
- Capture settings: record focus method, white balance, aperture, shutter speed, and ISO so changes affecting focus, depth of field, colour, and exposure are deliberate and verifiable.
Keep Product Scale, Framing and Angles Repeatable
Product scale, framing, and shot angle stay repeatable when the camera-to-product relationship is reproduced during capture rather than matched only through the final crop.
Match camera-to-product distance, viewpoint, product position, and the prescribed view so apparent scale, perspective, margins, and alignment remain comparable across adjacent catalog images.
Post-crop alignment does not necessarily correct a perspective change created by a different camera distance or angle.
The criteria below link capture geometry to the visible position and size of the product within the frame, and they should be checked together because crop alone can hide spatial differences.
Use the reference to compare frame occupancy, visual centre or alignment, margins, camera-to-product distance, viewpoint, and perspective without imposing universal measurements across different product categories.
Detailed decisions about consistent angles and composition belong to the composition workflow; here, reproduce the prescribed shot angle for nominally equivalent catalog views.
An angle change that belongs to the defined shot sequence is intentional, while an unplanned change between equivalent views is accidental drift.
- Frame occupancy: reproduce the intended product scale within the frame so comparable products do not appear inconsistently large or small because of capture geometry.
- Visual centre and alignment: align the product to the reference position or category-specific composition rule so its placement remains visually consistent.
- Margins: compare the surrounding space with the reference and retain the approved margin relationship unless product shape requires a documented variation.
- Camera-to-product distance and viewpoint: preserve the intended spatial relationship so perspective and apparent proportions remain comparable.
- Shot angle: reproduce the defined angle for equivalent views and use a different angle only when it belongs to the prescribed shot sequence.
Keep Background Placement and Styling Repeatable
Background placement and styling stay repeatable when the chosen visual system is reset consistently for equivalent shots rather than replaced with one universal background rule.
Reset the background tone, surface position, sweep or horizon, permitted props, and shadow treatment to their documented states so small changes in placement or treatment do not make otherwise comparable product images appear unrelated.
Where the styling rule permits variation, document the allowed condition and preserve the shared visual treatment.
The controls below apply to the already-chosen background setup rather than selecting a new background, and each identifies what should be reset before an equivalent shot.
Align the physical background elements to their recorded positions and compare their visible treatment with the reference before continuing.
Props should follow the established styling rule rather than being repositioned by preference, while documented category- or shot-specific variation may be used when it preserves the shared rules.
- Background tone: reset the backdrop to the documented tone or treatment so equivalent images retain the intended background appearance.
- Surface position: position the product surface according to the recorded setup so visible joins, edges, or surface relationships do not shift unintentionally.
- Sweep or horizon: reset the sweep to the recorded shape or align the horizon to its documented position so the background structure remains visually comparable.
- Props: when props are permitted, follow the styling rule for which props appear and where they are positioned so changes are intentional rather than incidental.
- Shadow treatment: preserve the documented shadow treatment for equivalent shots, or record an approved variation when the product or styling condition requires a different result.
Use a Repeatable Workflow for Batch Product Shoots
Batch consistency is maintained by repeating the same controlled sequence with checkpoints from reference confirmation through batch review.
The batch product photography workflow should preserve the approved baseline while allowing a documented exception when a product condition requires different treatment.
Every batch stage should either establish the baseline, reproduce it, or verify it.
This sequence is a consistency-control workflow rather than the complete production lifecycle.
Confirm the reference and shot list before capture, prepare each product for the required views, and follow the same capture sequence for comparable products.
Reset the established photography controls between products instead of carrying unnoticed changes into the next item.
Use first-image verification after the reset to confirm that the next product still follows the intended catalog treatment before completing its remaining shots.
- Confirm the reference and shot list. Complete reference confirmation before the batch begins so the required views and approved visual baseline are clear. Check that the shot list identifies the equivalent images that need to remain comparable.
- Prepare the product. Prepare each product according to the established presentation rules before capture so unintended differences in presentation are not introduced during the batch. Check the product against the required view before photographing it.
- Follow the capture sequence. Capture the required views in the established order so equivalent products pass through the same shooting workflow. Before moving on, check that the required views for the current product have been completed.
- Reset between products. Return the established photography controls to their recorded baseline before introducing the next product. Check the setup for unintended movement or treatment changes before capture resumes.
- Record a necessary exception. When dimensions, material, packaging, or another documented product condition makes the baseline treatment unsuitable, record the exception and the controlled adjustment. Do not treat undocumented improvisation as equivalent to an approved change.
- Verify the first image. Compare the first image after preparation, reset, or an approved exception with the reference before completing the remaining capture sequence. Continue when the intended catalog treatment is reproduced or the necessary variation has been documented.
- Review the batch. Compare equivalent views across the batch to identify changes that may have accumulated between the first product and the last. Use the batch review to distinguish documented exceptions from unintended drift.
Exception records should identify the product condition that required a controlled change so later batch review does not mistake that variation for drift.
Review equivalent images together and investigate unexplained changes against the recorded baseline and exceptions.
These checkpoints make gradual drift easier to detect without requiring every product to use identical treatment.
Use the Same Shot List and Capture Sequence for Each Product
Repeating the same approved shot list and capture order reduces omitted required views and unintended changes in angle coverage for comparable products.
The exact views can differ by product category, but each approved shot set should be followed in its defined order rather than improvised during the batch.
This makes completion visible before moving to the next product.
For comparable products, follow the approved capture sequence from the main image through each secondary view, confirming each required view as it is completed.
A product category may use a different approved shot set when its required coverage differs, without making that exception the sequence for other categories.
Keep the order repeatable within the applicable category so an omitted or substituted view can be identified before capture is considered complete.
Finish with a completion check against the shot list before moving to the next product.
- Capture the main image. Start with the approved main image for the applicable product category. Confirm that this required view has been captured before advancing in the sequence.
- Capture the first secondary view. Follow the next position in the approved shot list rather than choosing an angle during capture. Confirm that the required view matches that sequence position before continuing.
- Complete the remaining secondary views. Follow each remaining position in the approved capture order so comparable products receive the same intended angle coverage. Mark each required view complete before advancing to the next position.
- Perform the completion check. Compare the completed capture sequence with the approved shot list for that product category. Continue to the next product only after required views are accounted for or a defined category-specific exception is identified.
Reset Product Placement and the Shooting Setup Between Products
A between-product reset should return only the drift-prone controls that can affect the next comparable shot to their recorded baseline.
Check tripod position, light position, light power, placement marks, background position, and styling elements against recorded references rather than relying on visual memory alone.
The reset is a readiness check between products, not a teardown of the shooting setup.
The checklist below catches small physical changes that can accumulate across a batch and identifies the controls that must pass before the next product is photographed.
Return any shifted control to its recorded state, position the next product using the established placement marks, and restore applicable styling elements.
Finish by capturing the first test image and comparing that reference frame with the approved appearance before continuing.
- Tripod position: check the recorded camera and tripod position for unintended movement; return it to the baseline if it has shifted before the next product is captured.
- Light position: verify each light against its recorded position and correct movement that changes the intended illumination relationship.
- Light power: confirm that each light is at its recorded output state unless a documented product condition requires a controlled adjustment.
- Placement marks: align the product with the recorded centre or placement marks so the next comparable shot begins from the intended position.
- Background position: check the backdrop, surface, sweep, or horizon against its recorded position and reset any shift that changes the visible background treatment.
- Styling elements: return permitted props and other styling elements to their documented placement or treatment before capture resumes.
- Reference frame: compare the first test image with the approved reference frame for visible drift and continue only when the intended baseline is reproduced or a necessary exception has been documented.
Record Exceptions and Intentional Changes Between Batches
Documented exceptions distinguish an intentional change from accidental drift when the same product category is photographed again.
An exception log should record the affected product or category condition, the variable changed, the reason for the change, the approved treatment, the applicable batch or date, its effective scope, and whether the change should persist in a future shoot.
A temporary exception remains limited to its recorded condition, while a persistent category rule applies only when that future treatment has been explicitly approved.
The record should contain enough information for a later batch to reproduce the approved decision without relying on memory.
Identify what changed, why the baseline was unsuitable, where the approved treatment applies, and whether its persistence is temporary or intended for later shoots.
For example, if tall products repeatedly require greater vertical framing to fit the approved presentation, recording that product condition, the framing variable changed, the reason, and the approved treatment allows the change to become a repeatable category rule when approved rather than an undocumented one-off change.
The table records these relationships for later reuse.
| Product or Category | Variable Changed | Reason | Approved Treatment | Batch or Date | Effective Scope | Persistence |
|---|---|---|---|---|---|---|
| Tall-format product category | Framing allowance | Product proportions require more vertical space than the existing category baseline provides | Use the approved expanded vertical framing while retaining the shared background and viewpoint rules | Applicable recorded batch or date | Tall-format products meeting the documented condition | Persistent category rule when approved for future shoots |
Run a Consistency Check Before Publishing
A finished product image should be judged against the active reference standard and neighbouring catalog images rather than in isolation.
A photo passes the pre-publish consistency check when no unexplained deviation remains in the controlled attributes: each visible difference must either match the active standard for that product category or be covered by a documented exception.
Review both individual files and the batch as a set before publishing.
The checklist below groups the observable conditions that should agree before a batch is released.
Compare lighting and colour appearance, exposure, product scale and alignment, framing and background position, crop, editing treatment, and any obvious outlier against the approved reference standard.
A difference requires correction when it falls outside the approved category treatment or documented exception; a legitimate category-specific variation should not be treated as a failure.
- Lighting: compare the illumination character and shadow behaviour with the reference standard and neighbouring images. Pass when the lighting treatment remains within the approved catalog system; fix unexplained changes that make the image visibly inconsistent.
- Colour: compare overall colour appearance with equivalent catalog images. Pass when the product and background treatment remain consistent with the approved standard; fix unintended colour shifts that create a visible mismatch.
- Exposure: compare overall brightness and tonal treatment with comparable images. Pass when the exposure remains consistent with the established catalog appearance; fix unexplained brightness differences that make one image stand apart.
- Scale and alignment: verify the product's apparent scale, visual position, and alignment against the reference standard for that product category. Pass when the product remains within the approved composition rule; fix unintended size or position drift.
- Framing and background position: compare margins, framing, and visible background placement with neighbouring images. Pass when the spatial treatment matches the category standard or a documented exception; fix unexplained shifts in framing or background structure.
- Crop: verify that the final crop follows the approved crop convention for the applicable product category. Pass when product boundaries and surrounding space remain consistent with comparable images; fix crop differences that alter the intended catalog rhythm.
- Editing treatment: compare contrast, tonal rendering, colour treatment, and finishing character across equivalent images. Pass when the finished treatment remains within the approved catalog appearance; fix an editing difference that makes one file look inconsistent with the surrounding set.
- Outlier check: review the batch together and identify any image that appears noticeably different from neighbouring images without a documented reason. Pass when the difference is approved and traceable to the product condition; fix unexplained outliers before release.
Batch comparison can reveal drift that is difficult to notice when one file is viewed alone because differences become more visible beside equivalent images.
Treat the publication decision as pass or fix against the active reference standard and approved exceptions, not as a requirement that every product image be identical.
Release the batch when the individual images and the batch-level comparison show no unexplained consistency outliers.
Compare Lighting, Colour and Exposure Against the Reference
Lighting, colour, and exposure should be compared as three related but distinct signals against the approved reference and nearby catalog images.
Evaluate the illumination pattern and shadow direction separately from colour rendering and white balance, then compare overall brightness and tonal response as the exposure signal.
A visible difference in one signal does not by itself establish the cause of the change.
Interpret any mismatch by checking whether it reflects capture variation or a legitimate product-specific appearance.
Product colour and reflectance can change recorded brightness or colour appearance even when the lighting system remains consistent, so compare the observed state with the reference before deciding whether correction is required.
For example, a lighter or darker product may retain the same illumination pattern and shadow direction while requiring a controlled exposure adjustment to keep its tonal response within the approved catalog treatment.
Where a mismatch falls outside the expected product condition or documented treatment, correct the relevant capture or finishing variable rather than assuming a single cause from appearance alone.
- Lighting pattern: compare the illumination pattern, shadow direction, and overall lighting character with the reference. A consistent pattern is an acceptable match even if product reflectance changes brightness; a different pattern may indicate that light position or another lighting condition requires checking.
- Colour rendering: compare product colour, background colour appearance, and white balance with the reference and neighbouring images. A deviation may suggest a white balance, ambient-light, or processing difference, but product colour itself can also affect the visible comparison and should be considered before correction.
- Exposure and tonal response: compare overall brightness, highlight and shadow rendering, and tonal response with equivalent images. A controlled exposure adjustment may be acceptable when reflectance differs, while unexplained brightness drift requires checking the recorded exposure or lighting conditions.
Compare Product Scale, Framing, Alignment and Background Position
Catalog image geometry should be checked across product scale, framing, alignment, margins, perspective, angle, and background position together so a mismatch can be localised to capture geometry or cropping.
Compare equivalent images with the approved standard and neighbouring catalog images, allowing any documented product-category exception.
Matching outer margins alone is not enough when camera distance or angle has changed the product's perspective.
The checklist below links each visible geometry cue to the comparison that helps distinguish framing errors from perspective errors.
If product scale, alignment, and margins differ while perspective cues remain consistent, the mismatch may come from product placement or cropping; if apparent proportions or viewpoint change, camera distance or angle requires checking.
For example, an image whose background position and product alignment match the reference but whose product appears wider or narrower may indicate a capture-geometry difference rather than a crop-only mismatch.
Choose the correction only after identifying whether the inconsistency began in product placement, camera geometry, or cropping.
- Product scale: compare product occupancy in the frame with the approved reference for that product category. A scale difference with otherwise stable perspective may indicate placement or crop variation, while a change in apparent proportions requires checking camera distance or viewpoint.
- Alignment: compare the product's visual position with the approved centre or alignment rule. A positional shift with stable perspective may indicate product placement or cropping rather than a camera-geometry change.
- Margins: compare top, bottom, and side margins with the category reference rather than applying a universal margin value. Similar margins can still conceal a perspective mismatch if camera distance or angle changed during capture.
- Perspective: compare visible proportion and depth cues across equivalent images. A perspective difference may indicate changed camera distance or viewpoint and should be corrected at the capture-geometry level rather than treated as a crop-only issue.
- Angle: verify that the required angle for the equivalent catalog view matches the approved standard. An unintended angle change localises the mismatch to capture rather than final cropping.
- Background position: compare visible background reference points, horizon, sweep, or surface relationships with the standard. A background shift may indicate movement in the set or crop, depending on whether product perspective and alignment also changed.
- Cropping: compare the final frame boundaries after the capture-geometry checks. Use crop correction when perspective, angle, and product proportions already match the reference; do not use cropping as the default fix for a capture-geometry mismatch.
Check Crop and Editing Consistency Across Final Images
Final-image editing consistency can diverge during cropping and post-production even when capture was consistent, so the finished files should be compared with the approved editing baseline.
Evaluate the visible final treatment and any documented product-specific exception rather than requiring identical edit values for every image.
The checklist evaluates the transformation applied to equivalent catalog images rather than software settings in isolation.
Compare crop bounds, aspect treatment, product margins, exposure normalisation, colour normalisation, background cleanup, shadow treatment, and retouching strength by their visible result against the approved treatment.
Product-specific differences may justify a documented exception, but unexplained deviations should be identified before publication.
- Crop bounds and aspect treatment: compare the final frame boundaries and aspect treatment across equivalent images. They should follow the approved crop convention unless a documented product or category condition requires a different treatment.
- Product margins: compare the visible space around the product with the applicable editing baseline. A deviation should reflect an approved framing exception rather than incidental cropping.
- Exposure normalisation: compare the finished brightness and tonal relationship across equivalent images. The applied treatment should preserve the intended catalog appearance while allowing a documented adjustment when product characteristics require it.
- Colour normalisation: compare the final colour rendering of the product and surrounding image treatment with the approved reference. Consistency is determined by the visible result, not by whether identical numeric adjustment values were used.
- Background cleanup: compare the finished background for differences introduced during cleanup. The final background should retain the approved appearance unless an intentional exception has been documented.
- Shadow treatment: compare the retained, softened, or otherwise approved shadow appearance across equivalent images. A different shadow treatment should correspond to an approved product or category condition rather than an unexplained post-production change.
- Retouching strength: compare the visible degree of retouching across equivalent products. The finished files should remain within the approved treatment instead of showing noticeably different levels of cleanup or surface alteration without a documented reason.
Detailed techniques for consistent product photo editing belong to the editing workflow; here, the criterion is whether the approved final treatment was applied consistently across equivalent catalog images.
Diagnose and Correct Consistency Drift Between Products and Batches
Consistency drift should be traced to the earliest verified stage where a mismatch appears rather than corrected blindly downstream.
Compare the affected image with the active reference version and neighbouring catalog images first, then determine whether the deviation begins in the reference, setup, capture, or editing treatment.
The same visible mismatch can have several possible sources, so a suspected cause should be confirmed with an observable check before correction.
Start by defining the scope of the drift.
An isolated image or one-product mismatch suggests checking product placement, crop, camera settings, or editing treatment around that specific file or product.
A batch-wide change suggests checking setup movement, lighting, camera geometry, or a reference version used throughout the batch.
A new-session mismatch that affects many images should first prompt comparison of the reference version and recorded setup state before individual files are corrected.
The diagnostic table maps symptom scope to possible sources, the check needed to distinguish them, and the corrective direction.
Trace the mismatch from the reference version through setup, capture, and editing treatment rather than assuming the visible symptom identifies its cause.
Check setup movement, camera geometry, lighting, and product placement before treating crop or editing as the source when the mismatch is already present in the captured image.
Correct the first confirmed deviation, then verify whether later stages still contain inconsistency.
| Symptom Scope | Possible Source | Check | Corrective Direction |
|---|---|---|---|
| One image differs from neighbouring images | Crop, editing treatment, or an isolated capture change | Compare the original capture, final crop, and edited result with equivalent images and the active reference | Correct the first confirmed stage where the mismatch appears rather than compensating at a later stage |
| One product differs across several required views | Product placement, product-specific condition, camera geometry, or lighting response | Compare placement, viewpoint, lighting pattern, and the product's documented exception status across its views | Restore the relevant baseline or apply the documented product-specific treatment, then recheck the affected views |
| Several products within one batch drift in the same direction | Setup movement, camera geometry or settings, lighting, or progressive placement drift | Compare earlier and later images in the batch with the recorded setup and reference to identify where the deviation first appears | Correct the earliest confirmed setup or capture change and review downstream images produced after that point |
| An entire batch differs from earlier catalog images | Reference version change, batch-wide setup difference, camera settings, lighting, or editing treatment | Verify which reference version was used, then compare recorded setup, capture state, and final treatment with the previous approved batch | Restore the approved state or document an intentional change before correcting affected files |
| A new session differs consistently from the previous session | Reference version, setup movement between sessions, camera geometry, lighting, or output treatment | Check the active reference first, then compare recorded camera, lighting, background, placement, crop, and editing states between sessions | Correct the earliest verified session-level deviation and recheck subsequent images before applying downstream fixes |
Correct the earliest confirmed source of drift first, then recheck any downstream images because later crop or editing changes may have been compensating for the original inconsistency.
Do not mask a capture-stage mismatch with arbitrary editing when the underlying camera geometry, lighting, or product placement still differs from the reference.
Broader causes and recurring failure patterns belong within product photography mistakes; this troubleshooting process remains focused on locating and correcting consistency drift.
When One Product Does Not Match the Catalog Standard
When one product does not match the catalog standard, first classify the difference as either a legitimate product characteristic or local process drift in capture or the final edit.
A difference in size, material, packaging, or another product characteristic may justify an approved exception, while an isolated mismatch in framing, perspective, placement, background, or editing treatment requires checking against the reference and adjacent products before correction.
Compare the one product with the reference and adjacent products for lighting, camera perspective, scale, product placement, framing, background treatment, and final edit, then identify the first stage where the image begins to diverge.
For example, if the product alone has different framing, check whether its placement changed while camera distance and perspective remained consistent; if perspective also changes, camera distance or another capture variable may require correction.
If the original capture matches the standard but the finished image differs, check the final edit or crop as the later stage where divergence may have appeared.
If the visual difference corresponds to a documented product characteristic and approved exception, retain that treatment rather than correcting it as drift.
Choose reshooting or re-editing only after the first confirmed stage of divergence has been identified.
When a New Batch No Longer Matches the Existing Catalog
When a new batch no longer matches the existing catalog, investigate controls shared across the shooting session before correcting individual files.
A batch-wide mismatch points first to a changed reference version, capture-session condition, or batch editing treatment rather than a single-product cause, although the exact source should remain unconfirmed until a recorded difference is verified.
The diagnostic checklist below tests shared controls in the order most likely to expose session-wide drift.
Compare the active reference version with the one used for the existing catalog, then verify camera settings, camera height and distance, light position and power, ambient conditions, background setup, and placement marks against the recorded baseline.
If those capture-session controls remain consistent, compare the batch editing treatment with the approved final treatment.
Several variables may change between shooting days, so identify the earliest verified change before deciding whether correction belongs in setup, capture, or post-production.
- Capture-session — reference version: verify that the new batch was produced against the same approved reference version as the existing catalog. A different interpretation or version may account for a session-wide mismatch and should be resolved before later controls are corrected.
- Capture-session — camera settings and geometry: compare recorded camera settings, lens state, camera height, and camera distance with the baseline. A confirmed change may indicate that the mismatch originated during capture rather than in individual product placement or editing.
- Capture-session — lighting: compare light position and light power with the recorded setup. If the lighting relationship differs across the whole session, correct that shared condition before attempting file-by-file adjustments.
- Capture-session — ambient conditions: check whether ambient conditions differed from the recorded shooting environment in a way that may have altered the new batch. Treat the condition as a possible source only when the difference is observable or documented.
- Capture-session — background setup and placement marks: compare the background setup and product placement marks with the established baseline. A shared shift can create repeated framing or position differences across many products in the batch.
- Post-production — batch editing: compare the batch editing treatment with the approved catalog treatment after capture-session controls have been checked. If the captures align with the reference but the finished files diverge, the earliest verified change may be in post-production rather than the shooting session.
Maintain the Visual Standard as the Product Catalog Changes
Long-term consistency means controlled evolution of the active standard rather than permanent sameness.
When products, categories, teams, or production conditions change, an intentional improvement can replace an older rule if the change is explicit, repeatable, and documented instead of emerging as gradual undocumented drift.
Change control is warranted when the proposed treatment is intentional, repeatable, has a defined scope, and creates an observable catalog effect.
Give each approved standard revision a distinct version identifier and record the effective date or batch so future batches can be compared with the correct active standard.
Test the proposed treatment with a representative test image or small representative set before it becomes the new baseline.
Record the approved change, its scope, and the effective date or batch from which the rule applies.
Keep the previous standard version distinguishable from the new one so later differences are interpreted against the correct reference.
The sequence below governs a controlled standard change rather than routine shooting.
- Identify the proposed change: define what differs from the current active standard and which products or categories the change is intended to affect.
- Create a representative test image: apply the proposed treatment to a product that can reveal whether the change remains coherent with the surrounding catalog.
- Evaluate the catalog effect: compare the test image with the current baseline and neighbouring images to determine whether the change produces the intended visual result without creating an unintended catalog mismatch.
- Approve and version the standard: document the approved change as a new standard version, including its defined scope and effective date or batch.
- Verify future batches: compare later production during periodic review with the active standard to confirm that the approved treatment remains repeatable rather than drifting gradually.
Periodic review should compare new batches with the active standard and relevant older images so a meaningful catalog mismatch can be identified before it spreads.
Older imagery does not automatically need revision when the standard changes; remediation may be warranted when old and new treatments create a visible inconsistency that materially disrupts catalog coherence.
If the difference remains acceptable within the defined scope, the historic images can remain while all new production follows the active version.
This keeps the catalog consistent through controlled updates rather than continual redesign.
Update the Standard Only for Intentional Visual Changes
A proposed visual change should become the new baseline only when it is intentional, repeatable, defined in scope, and explicitly approved.
A one-product accommodation remains an exception unless a documented decision deliberately applies the change to a broader product category or catalog scope.
Evaluate the proposed change by recording its reason and determining whether the treatment can be reproduced under the conditions where it is intended to apply.
Define the affected products or categories so the scope is clear rather than inferred from one difficult batch or isolated product.
Compare the visible impact with the current standard and confirm the approval state before the standard revision applies to broader use.
The approved documentation should state what the new baseline replaces so the previous rule does not remain ambiguous.
The criteria below prevent one-off deviations from silently becoming catalog rules by linking each proposed change to its classification as an exception or new baseline.
- Reason: the proposed change qualifies for further consideration when it responds to an intentional visual objective; a workaround used only because one batch was difficult to reproduce does not by itself justify a standard revision.
- Repeatability: the treatment qualifies as a possible new baseline when it can be reproduced for the products or categories within its intended scope; an isolated result that cannot be repeated remains outside the standard.
- Scope: the decision must identify which products or categories the controlled change applies to. A one-product accommodation remains an exception unless broader use is deliberately approved.
- Visible impact: the proposed change should have an observable effect relevant to catalog coherence. If the difference does not warrant replacing the current rule within the defined scope, it remains an exception or does not require a standard revision.
- Approval state: the change becomes the new baseline only after a documented decision explicitly approves it and identifies the previous rule it replaces; until then, the existing standard remains active.
Apply Approved Changes Consistently Across Future Shoots
An approved change becomes reliable only when the active reference, written rule, effective scope, and first-sample verification are synchronized before routine use.
The rollout should make the new baseline unambiguous so future shoots do not alternate unpredictably between the old and new treatment.
The sequence below applies the approved update from a defined boundary and prevents old and new rules from being used unpredictably within the same scope.
Update the active reference and written rule first, communicate where the change applies, and begin using it from the defined batch boundary or category boundary.
Verify the first representative image or small representative set against the new baseline before routine production continues.
Continue monitoring future shoots against that baseline, and reconsider older imagery only when a visible mismatch warrants it.
- Update the active reference and written rule: replace the superseded reference example and production instruction with the approved version. Verify that both describe the same final treatment before the change is used in production.
- Communicate the effective scope: state which products, categories, or shooting conditions the approved update applies to. Verify that the scope is explicit enough to prevent the old rule from being used where the new one is active.
- Apply the change from a defined boundary: begin the new treatment from the approved batch boundary, category boundary, or other recorded transition point. Verify that work after that boundary follows the new rule rather than mixing old and new treatments within the same scope.
- Verify the first representative image: compare the first representative image or small representative set with the active reference before routine production continues. Proceed when the visible result matches the approved update within its defined scope.
- Monitor future shoots against the new baseline: compare subsequent batches and representative samples with the active reference to identify drift after rollout. If later images diverge, correct the implementation against the new baseline rather than reverting informally to the previous rule.