
Diagnosing Blurry Ecommerce Product Photos
To fix blurry ecommerce product photos, identify the first stage where the same product detail loses sharpness. If the original capture is already soft, correct movement or focus/depth-of-field and reshoot; if the master is sharp but a later version becomes soft, reprocess or redeliver from the sharp master and verify the served asset at its intended display size.
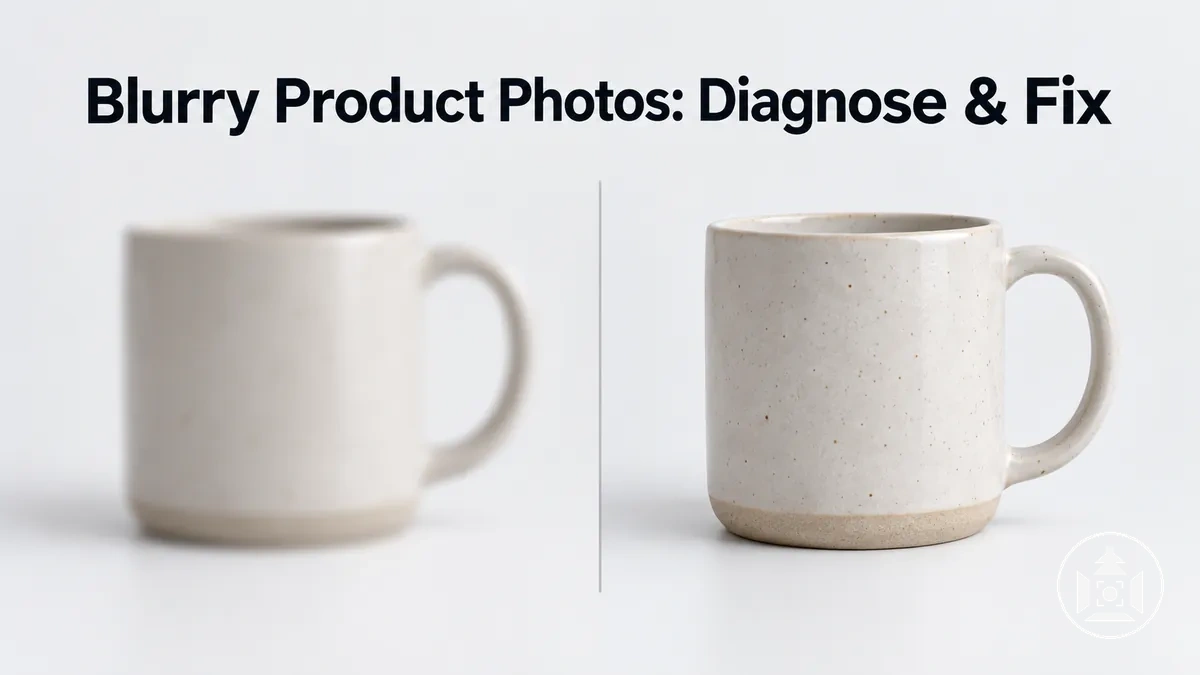
Find where the blur starts
Choose the state of the original or master image, then select the visual pattern or the first downstream stage where softness appears. The result gives the most useful diagnostic branch and next check; it does not treat a single visual cue as proof of cause.
Start with the original or master file and compare the same product detail with each later image state.
Judge the result at the intended display size or a controlled matched scale. When several transformations occur between two states, isolate them one at a time before assigning a cause.
Capture-side blur can involve motion, missed focus, or insufficient depth of field, while post-capture sharpness loss can appear during resizing or resampling, display enlargement, or lossy compression.
More than one mechanism can coexist, so visible softness alone does not establish a single cause.
Use the same high-contrast product detail as the reference at each workflow stage and compare it at a matched or intended viewing size.
If the original capture is soft, stay on the capture branch; if the master image remains sharp but a later version loses detail, trace the derivative, served asset, and rendered state in order.
Do not treat upload timing, file format, or a platform change as proof of cause: the key diagnostic value is the first changed image state.
Table of Contents
Determine Where Blur Enters the Image Workflow
The primary diagnostic breakpoint is the earliest image workflow stage where a product image shows new softness compared with the previous version.
Use the original capture as the sharpness baseline, then compare each later image state with the state immediately before it.
A first change identifies the transformation or group of transformations to investigate, but it does not by itself prove the specific mechanism behind the blur.
Track the same product detail through the original capture, the processed derivative, and the uploaded or rendered result.
This stage-by-stage view makes the point where sharpness changes visible while the ordered checks establish what that change implies.

- Original capture: Inspect the source file at a suitable viewing scale and use its product-edge detail as the baseline. If the original capture is already soft, the diagnostic breakpoint is at or before capture rather than in a later derivative.
- Resized or exported file: Compare the resized file or exported file with the source file using the same product detail. If the source remains sharp but the derivative shows a new loss of detail, the first change occurs during the processing stage, narrowing the investigation to transformations between those two states.
- Uploaded or rendered image: Compare the uploaded image and rendered image with the processed file supplied before display. If the derivative remains sharp but the displayed image becomes soft, the diagnostic breakpoint lies after that derivative; this suggests investigating the transformations applied between upload and rendering rather than assuming platform fault from timing alone.
For example, if lettering and product edges remain sharp in the source file and exported file but appear softer in the rendered image, the first detected sharpness change is between export and rendering.
If several transformations occur within that interval, the comparison narrows the diagnostic range to those transformations rather than confirming one cause.
Blur Already Visible in the Original Capture
If blur is already visible in the untouched source file, the problem is on the capture side because that softness exists before later processing.
Capture-side blur establishes where the defect first appears, but it does not by itself identify the specific capture mechanism.
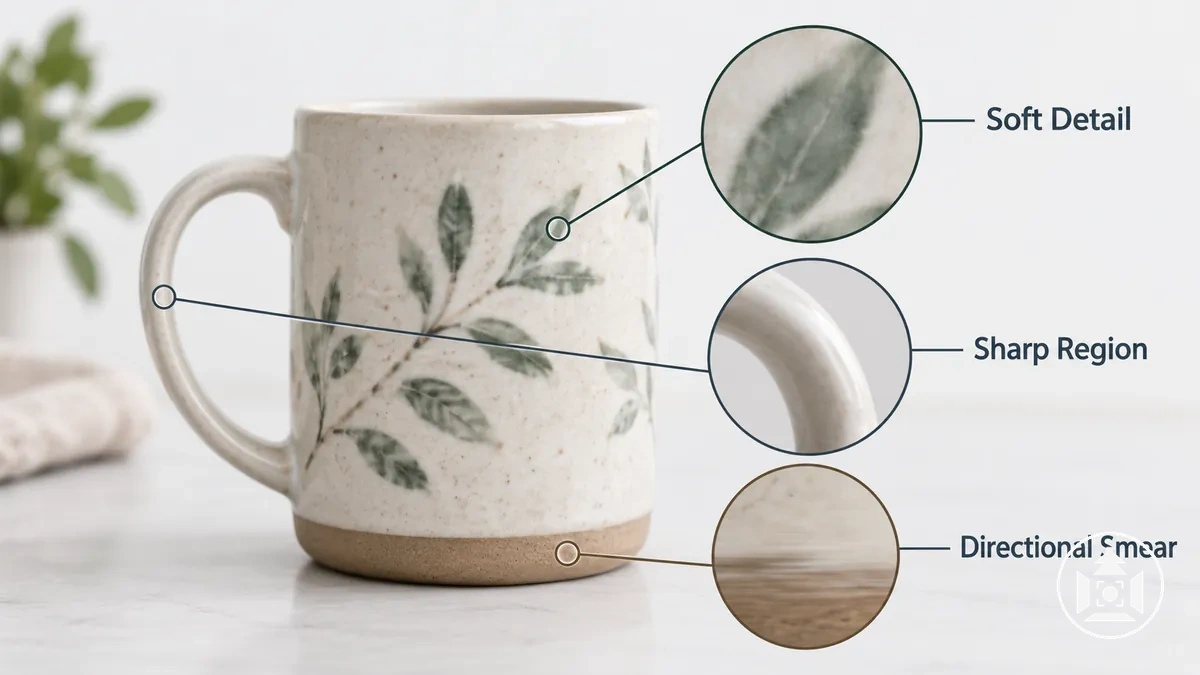
Inspect the original capture for where sharp detail remains, whether product edges show directional blur, and whether the intended focus plane contains sharp product detail.
A sharp region can help locate where clarity remains, directional edge smear can be a diagnostic signal of movement, and a sharp region outside the intended product plane can suggest a focus-related issue; none of these cues alone proves a specific cause.
The annotated source image highlights these visible cues while keeping the diagnosis limited to confirming that the blur is already present at capture.
The next local distinction is whether the observed pattern is more consistent with motion or focus blur.
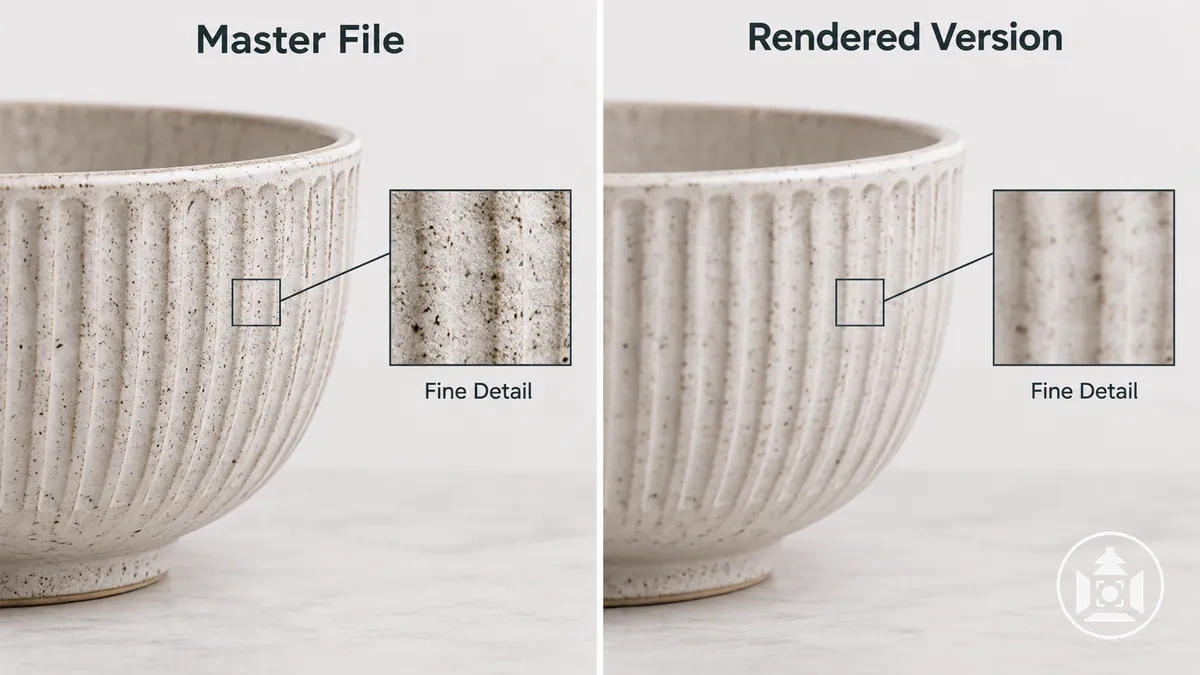
Sharp Originals That Lose Detail After Processing or Upload
If a sharp original remains clear in the master file but a later derivative or rendered version becomes softer, the diagnosis shifts from capture quality to post-capture degradation.
The first observed loss of fine detail identifies the downstream interval to investigate, while the specific transformation remains uncertain when several processing or delivery steps occur within that interval.
Compare the same product detail at a matched viewing scale across the master file, the derivative created during resizing or export, and the rendered version, noting the source dimensions, derivative dimensions, rendered size, and any visible change in fine detail.
If the master file and exported derivative remain sharp but the rendered version loses detail, the changed state occurs after export; if the derivative is already softer than the master file, the change occurs earlier in the post-capture path.
This matched-state comparison locates the degradation without treating file format, upload timing, or a particular platform as proof of cause.
The diagnostic domain therefore remains post-capture processing, delivery, or display until the responsible transformation is isolated.
Distinguish Motion Blur From Focus Blur in the Original Capture
Motion blur and focus blur are distinguished by where sharpness remains and by how product edges lose definition.
Motion blur is suggested when movement produces a directional smear, while focus blur is suggested when the sharp plane falls away from the intended product detail or the depth of field leaves too little of the product acceptably sharp.
Because both can make the same product image look soft, the visual pattern is a diagnostic signal rather than proof of a single cause.
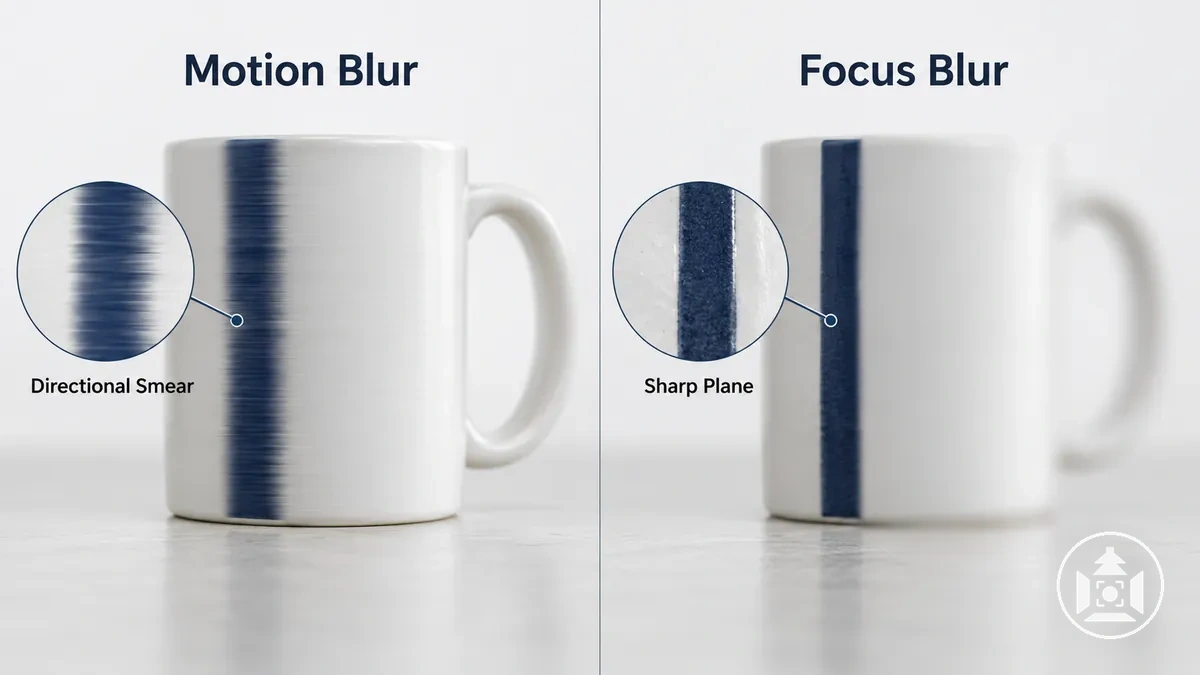
For suspected motion blur, inspect high-contrast product edges for an edge smear that follows a direction rather than simply fading evenly out of focus.
Camera movement, product movement, or both can produce movement-related blur during the capture, so a directional smear supports motion blur when its direction is consistent across affected detail.
A useful diagnostic check is whether stationary detail and moving detail show different blur behaviour, or whether similarly oriented smearing appears across otherwise separate edges.
For suspected focus blur, locate the sharpest region and compare it with the intended product detail.
If a different part of the product forms the sharp plane, missed focus is more consistent with the evidence; if the intended plane is sharp but nearer or farther product areas become soft, limited depth of field is the stronger interpretation.
The confirming check is therefore where sharp detail actually falls across subject depth, not softness alone.
| Blur type | Typical signal | Likely mechanism | Confirming check | Next direction |
|---|---|---|---|---|
| Motion blur | Directional smear or similarly oriented edge streaking | Relative movement from camera movement, product movement, or both during capture | Check whether the direction and distribution of edge smear are consistent with movement | Investigate movement and exposure conditions |
| Focus blur | Sharpness falls on the wrong plane, or only limited subject depth remains sharp | Missed focus or insufficient depth of field for the required product depth | Locate the sharp plane and compare it with the intended product detail | Investigate focus placement and required depth of field |
Mixed evidence can indicate that movement-related blur and focus-related softness coexist, while inconclusive evidence should remain unclassified until another diagnostic check separates the plausible causes.
Once the blur type has been narrowed, camera settings that affect sharpness provide the boundary for examining detailed exposure and focusing configuration.
Motion Blur From Camera or Product Movement
Motion blur is a loss of sharp edge detail caused by relative movement between the camera and product during the exposure.
When that movement is recorded, product edges can form a directional smear rather than retaining a single sharply defined boundary.
The smear direction is useful evidence of movement, but the visible pattern alone may not identify whether the camera, product, or both moved.
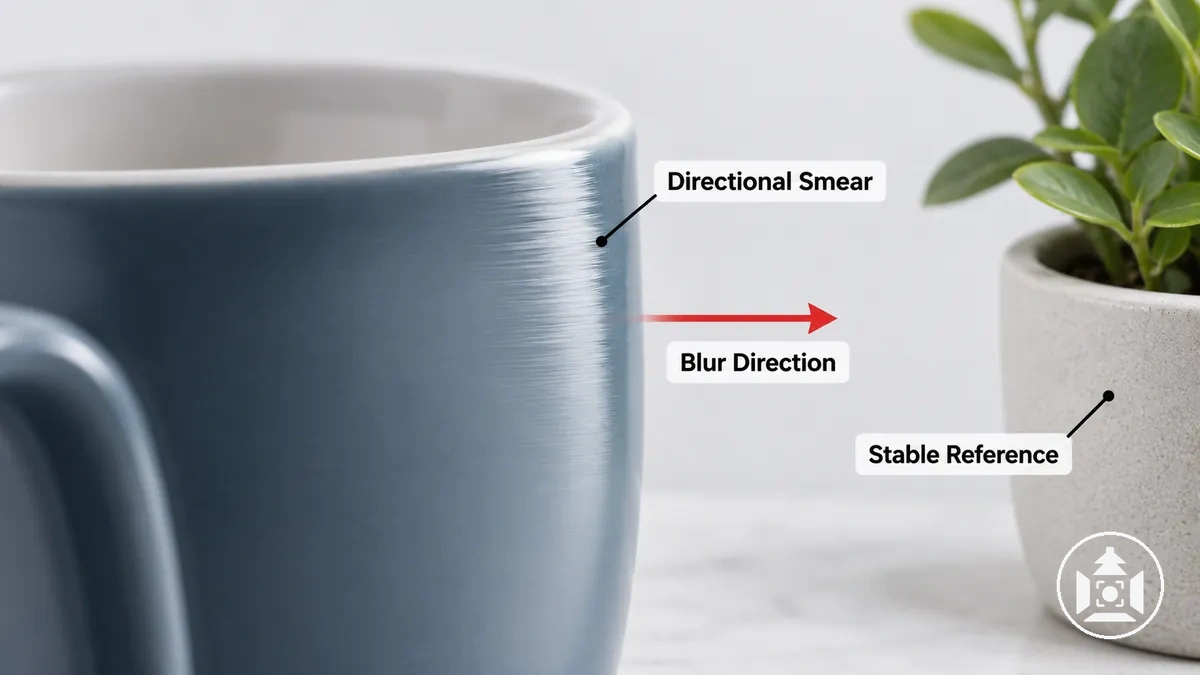
Camera movement can affect edge detail across much of the frame when the camera shifts during the exposure, while product movement can produce a more localized movement pattern when the product changes position relative to otherwise stable scene detail.
A similar smear direction across separate stationary edges is consistent with camera movement, whereas smear concentrated on a moving product while stable reference detail remains sharper supports product movement.
The direction and extent of the smear therefore help narrow the source of relative movement without making either pattern conclusive on its own.
Confirm the interpretation against the shooting conditions before assigning camera movement or product movement as the cause. When movement is being recorded, a shorter exposure (faster shutter speed) records less movement during the exposure; camera and product stability remain separate variables to control.
Focus Blur From Missed Focus or Insufficient Depth of Field
Focus blur occurs when the intended product detail falls outside the sharp focus plane or outside the usable depth of field.
The location of the remaining sharp region shows where usable focus actually falls, so softness in the intended product detail can be assessed against that region rather than against the image as a whole.
Missed focus is more consistent with a sharp region that falls on a different part of the subject instead of the intended product detail.
Insufficient depth of field can leave the intended focus plane sharp while other required parts of a product with greater subject depth fall outside the in-focus area. A smaller aperture (higher f-number) generally increases depth of field, while greater magnification reduces it; subject distance and focal length also influence how much of the product remains acceptably sharp.
Background blur can be intentional and does not by itself indicate focus blur when the required product subject and intended product detail remain sharp.
The diagnosis therefore depends on where sharpness remains and whether the usable depth of field covers the product detail that needs to be in focus.
Diagnose Sharpness Loss After Resizing or Upload
Post-capture sharpness loss should be diagnosed by comparing a confirmed sharp master with each later derivative and the final rendered state.
Check the same fine detail at each stage and identify the first state where it becomes softer.
This diagnostic breakpoint separates a change in image data from softness that appears only when an otherwise unchanged asset is displayed at a different size.
If several transformations occur between two compared states, finer isolation is required before assigning a cause.
For the resizing branch, compare the sharp master's source dimensions with the derivative dimensions and determine whether resizing or resampling coincides with the first loss of fine detail.
A derivative with reduced pixel dimensions contains fewer samples than the larger source, but smaller dimensions alone do not establish that resizing caused the observed softness.
Attribution requires comparing the source and derivative at an appropriate viewing scale and confirming that the sharpness change first appears after that resizing step.
For the delivery and processing branches, compare the generated variant that is actually served with its derivative dimensions and rendered size; if an undersized asset is rendered larger than its available pixel dimensions, display scaling is a distinct diagnostic possibility.
If the served image has adequate dimensions but new artifacts or loss of fine detail appear after compression, compare its compression state with the preceding file before attributing the change to compression.
Recompression or repeated processing is a separate possibility when another processed generation loses detail that remained visible in the prior state, so each generation must be compared rather than treating all downstream softness as one upload problem.
Once the diagnostic branch is isolated, ecommerce image size and quality requirements provide the separate boundary for detailed dimension and quality guidance rather than determining which downstream transformation introduced the softness.
The first changed state—after resizing, during served-versus-rendered display scaling, or after compression or recompression—guides the next check.
Resizing or Enlargement That Removes Fine Detail
Resizing changes how the original pixel detail is represented because the image must be resampled to new target dimensions.
Controlled reduction removes or combines existing pixel information, while enlargement beyond the original dimensions must represent the same captured detail across more pixels and may make edges or textures appear softer.
Enlargement does not create genuine source detail that was never captured.
Compare the original dimensions with the target dimensions and note the scaling direction before judging the result.
If a smaller target still retains adequate edge definition and texture at the intended display size, the reduction has not necessarily produced a meaningful visible loss; if a larger target shows softer edges or less distinct texture than the source under matched viewing conditions, the enlargement is consistent with resampling-related detail loss.
The strength of that change depends on the available source detail, the amount and direction of scaling, and how the resampled image represents neighbouring pixels.
Evaluate sharpness at the intended display size rather than using uncontrolled zoom as the quality test.
Display Scaling That Stretches an Undersized Image
A product image can remain unchanged as a file yet show visible softness when the delivered raster image is rendered larger than its available pixel dimensions.
This display scaling enlarges the served content at display time, so the first check is whether the rendered size exceeds the delivered dimensions rather than assuming the source file itself is blurry.
The severity can vary with image detail and device display demands, but the delivered-versus-rendered mismatch remains the condition to verify.
Compare the delivered dimensions with the rendered dimensions at the intended size, then identify which generated variant the browser is actually serving.
If the browser-served asset is an undersized generated variant and its rendered size exceeds the detail available in that variant, the mismatch suggests display enlargement as the source of the softness.
Device display context can increase pixel demand beyond the CSS-rendered dimensions, so it should be considered alongside the delivered and rendered dimensions rather than treated as a universal explanation. A raster asset smaller than its rendered CSS dimensions necessarily requires enlargement; higher-density displays can require a larger delivered variant to preserve one source pixel per device pixel.
Confirm the diagnosis against the dimensions of the asset actually served to the browser, not merely the dimensions of the originally uploaded product image.
Compression and Recompression That Reduce Sharpness
Lossy compression can remove subtle image information from fine detail and texture, reducing sharpness when enough information is discarded to become visible.
Recompression through repeated saves, export, or optimization can compound that degradation because another lossy processing stage can discard or distort detail retained by the preceding version.
Compression therefore does not imply visible blur in every product image; the visible effect depends on the compression applied and the image information affected.
Stronger compression or repeated compression may make fine product texture and edge detail less distinct, while ringing around contrasting edges or block artifacts can provide more specific diagnostic cues.
If an export retains detail but a later optimization or recompression introduces these artifacts or further detail loss, that change is consistent with compression-related degradation at the later stage.
Conversely, compression with little observable change in fine detail or artifacts provides weaker evidence that it explains the visible softness.
A compression diagnosis is therefore better supported by detail loss, ringing, block artifacts, or degradation that first appears after lossy processing than by generic softness alone.
Fix Blur at the Stage That Caused It
Correct blur at the diagnosed stage where sharpness first degraded, because a corrective action applied elsewhere cannot remove the condition that introduced the defect.
The diagnosed stage determines the corrective direction: capture blur requires a capture-side intervention, while downstream softness requires correction in the relevant processing or delivery stage.
Verification should then compare the corrected result with the relevant baseline to confirm that the targeted change improved the affected detail.
For capture blur, correct the shooting condition by addressing focus or movement and retake the product image rather than relying on later processing to recreate missing source detail.
For softness introduced by resizing, adjust the image dimensions or resizing step so the required detail is retained for the intended output.
For display scaling, correct the delivery mismatch so the browser receives an appropriately sized asset for the rendered size and device display demand.
For compression-related degradation, adjust the export or optimization process and avoid unnecessary recompression when repeated lossy processing is the diagnosed source of detail loss.
In each branch, the corrective direction follows the stage already identified by the preceding diagnosis rather than a generic sharpening treatment.
After the correction, retest the same product detail and verify that sharpness is preserved through the affected stage and subsequent output.
Post-processing may improve the appearance of retained detail, but it cannot recreate source detail that was never captured in the master file.
Correct Capture Blur Before Editing
If motion blur or focus blur is already present in the source file, correct the diagnosed capture condition before relying on sharpening or other editing.
Missing source detail cannot reliably be recreated later, so produce a new capture and verify the intended product area before continuing downstream.
- Identify the capture failure: Determine whether the diagnosed source-level problem is motion blur or focus blur.
- Correct the relevant condition: Improve stability or movement control for motion blur, or correct focus placement and required depth of field for focus blur.
- Make a test capture: Retake the product after the targeted capture adjustment.
- Verify the intended detail: Check that the required product area contains sharp product detail before proceeding to downstream editing.
For motion blur, address the diagnosed movement condition by improving camera or product stability. If movement is being recorded, use a shorter exposure (faster shutter speed) as appropriate, then rebalance exposure through lighting, aperture, or ISO rather than accepting movement-induced softness.
Make a test capture after the change so the result can be checked before continuing the workflow.
For focus blur, refocus on the intended product area and ensure the usable depth of field covers the product region that needs to remain sharp.
Verification should confirm that the intended detail, rather than an unintended sharp region, is acceptably sharp in the new source file.
Once capture-specific blur has been corrected, broader issues belong with common ecommerce photography mistakes rather than this recapture loop.
Keep detailed camera-setting choices and unrelated photography problems outside this blur-specific correction step.
Preserve Sharpness Through Resizing, Export and Upload
Keep the sharp master as the baseline while producing and checking every downstream version.
Compare each derivative with that baseline so a new loss of detail can be tied to the stage where it first appears rather than assumed to result from upload alone.
- Preserve the sharp master: Keep the master file unchanged as the comparison baseline, and confirm that the required product detail is sharp before creating a derivative.
- Create correctly sized output: Resize from the sharp master to output dimensions appropriate for the intended display size, then compare the derivative with the master to check that required detail has not newly degraded.
- Control export processing: Export the derivative while avoiding unnecessary repeated lossy processing or recompression, then compare its fine detail with the preceding state for any new softness.
- Upload the derivative: Upload the checked derivative, identify the image subsequently served, and compare it with the local derivative to verify that upload or downstream processing has not introduced new softness.
- Verify the served result: Compare the actual served image with the local derivative at its intended rendered size and verify that required product detail remains acceptably sharp.
Select output dimensions according to the intended display requirement rather than applying one universal resize or export setting.
Minimize unnecessary repeated lossy processing because each additional processing stage creates another point where verification may reveal a change from the preceding derivative.
After upload, compare the served image with the local derivative and check its rendered size against the dimensions of the asset actually delivered.
If sharpness changes only in the served or displayed state, keep the investigation on that downstream transformation rather than treating the sharp master as the source of the new softness.
Detailed adjustments beyond this blur-specific preservation sequence belong in the broader workflow for editing ecommerce product photos.
File-format selection and complete editing procedures remain outside this subsection.
When to Reprocess a Blurry Product Photo and When to Reshoot It
Reprocess a product photo when usable detail remains in the source file and the visible defect appeared through downstream degradation such as resizing, scaling, or compression.
Reshoot when the required product detail is already absent or materially blurred in the source because of motion blur, missed focus, or insufficient depth of field for the required product region.
Recoverability therefore depends on source-file sharpness, retained critical detail, the stage where degradation occurred, and the final display requirement.
| Criterion | Condition | Likely direction | Why |
|---|---|---|---|
| Source-file sharpness | The master remains sharp in the required product area. | Reprocess | Usable detail remains available for a new downstream version. |
| Stage of degradation | Softness first appears after resizing, display scaling, compression, or other downstream processing. | Reprocess | The source remains usable, so the later transformation is the appropriate correction point. |
| Retained critical detail | Motion blur or missed focus has materially obscured required source detail. | Reshoot | The source lacks the detail needed for meaningful reprocessing. |
| Required display quality | Mild softness remains, but critical detail is still visible at the intended display size. | Evaluate before deciding | The current source may remain usable if its retained detail satisfies the display requirement. |
Source-file sharpness and the stage of degradation establish whether useful information remains available for reprocessing.
A sharp master with downstream degradation supports reprocessing, while source-level motion blur or missed focus points toward reshooting when the critical product detail required for the intended use is no longer adequately retained.
The final decision should also account for the display requirement because the same retained detail may be sufficient for one presentation but inadequate for another.
Mild softness is a borderline case: if usable detail remains and the image satisfies the intended display requirement, reprocessing may be sufficient.
If the required presentation exposes missing or materially blurred critical detail, reshooting is the more defensible direction.