
How to Photograph Reflective Products for Ecommerce
To photograph reflective products for ecommerce, start with a large, diffused apparent light source and control what the product reflects by adjusting the camera or product angle, light position, and nearby bright or dark surfaces. Keep product detail and edge separation visible; the goal is controlled, intentional reflections, not a reflection-free surface.
Reflection-control workflow
Use the reflection visible from the final camera position as feedback. Fix the composition, change one controllable variable at a time, and keep only changes that improve product form, detail, and edge separation.
Prepare the reflected environment. Clean and secure the product, establish the camera view, simplify the background, and remove or mask nearby shapes that should not appear in the surface.
Shape the highlight. Start with a large apparent source and diffusion. With source size unchanged, moving it closer generally increases its apparent size; adjust distance, diffusion, and placement until the reflected gradient describes the form.
Redirect unwanted reflections. Change the camera angle, product orientation, light position, or reflected surroundings according to the object you can see in the reflection while preserving the required ecommerce composition.
Verify before capture. Accept the setup when highlights communicate material and shape, important detail is recorded without clipping, edges remain distinct, and unwanted room or camera reflections are no longer distracting.
Match the visible problem to the first control to test
| What you see | First control to test | What confirms the correction |
|---|---|---|
| Small, hard hotspot | Increase apparent source size or adjust diffusion. | The highlight becomes a smoother gradient without flattening useful form or texture. |
| Camera, photographer, or room object visible | Change camera or product angle first; if needed, reposition or mask the reflected surrounding object. | The unwanted object leaves the reflected field while the required product view remains usable. |
| Product edge disappears | Change the background or reflected field, or introduce a white or black card for controlled edge contrast. | The contour becomes readable without creating a distracting stripe or obscuring surface detail. |
| Highlight shape is useful but detail is clipped | Correct exposure or light output after the reflection shape is right. | Required highlight detail is recorded; exposure is not being used to compensate for poor reflection geometry. |
| Glare changes when a polarizing filter is rotated | Keep the filter only at a rotation that reduces distracting glare without removing useful highlights. | The surface remains readable and material cues are preserved; little or no response means geometry and diffusion remain the primary controls. |
For polished metal, reflected-environment control is usually more important than polarization. For glass and many non-metallic glossy finishes, a polarizing filter may reduce some glare, but its usefulness still depends on viewing angle and the observed response to filter rotation.
The useful highlight pattern depends on the material, surface geometry, and setup, so judge a reflection by whether it improves product readability rather than by brightness alone.
Reflective products show the brightness, shape, and position of their surrounding surfaces, so changing the light, camera angle, or reflected environment changes what appears on the product.
Increasing apparent source size and using diffused light can produce broader, smoother highlight shapes, while the camera angle and product orientation determine which parts of the surrounding environment become visible as reflections.
On glass, polished metal, and glossy finishes, these relationships can produce useful specular highlights that reveal shape and edges, or distracting glare that hides product detail.
The goal is therefore to create a reflected environment in which highlights remain intentional and the product stays visually readable for ecommerce.
The sections below apply this principle to preparation, light shaping, angle control, surface-specific behaviour, capture checks, and troubleshooting.
Table of Contents
Why Reflective Products Need Controlled Reflections Rather Than Reflection-Free Lighting
Useful images of reflective products usually retain controlled reflections because a reflective surface records surrounding brightness and shape, and those reflections help reveal gloss, curvature, and material.
A controlled specular highlight can therefore describe the product's form, whereas distracting glare can obscure product detail.
Surface reflectivity, the apparent light source, viewing angle, and reflected surroundings all affect the visible reflection.
A larger apparent light source can produce a broader, smoother highlight gradient than a smaller apparent source, while changing the viewing angle changes which surrounding surfaces are reflected toward the camera.
Depending on surface finish and curvature, these changes can improve edge definition and shape readability or produce bright reflections that distract from product detail.
Reflection-free lighting is therefore not the objective; the useful distinction is between reflections that communicate the surface and reflections that interfere with it.

The acceptable reflection pattern depends on the reflective surface and the form the image needs to describe.
Controlled reflections should preserve highlight structure that communicates material and curvature while keeping glare and reflected surroundings from obscuring important product features.
Prepare the Product and a Controllable Shooting Area
Reflective-product preparation should create a clean surface, stable positioning, and a controllable shooting area before lighting refinement begins.
The product condition should be clean and secure, while the environment condition should provide a simple background and a reflected environment whose visible shapes and brightness can be controlled.
Fingerprints, dust, and smears can become conspicuous when they intersect a highlight, while movement in the product changes its orientation and therefore its reflection geometry.
Room objects and other nearby surfaces can also appear in mirror-like areas, so inspect both the product and its reflected surroundings from the intended camera position.
The preparation variables to check are the surface condition, product stability, background, nearby reflected surfaces, and camera viewing direction.
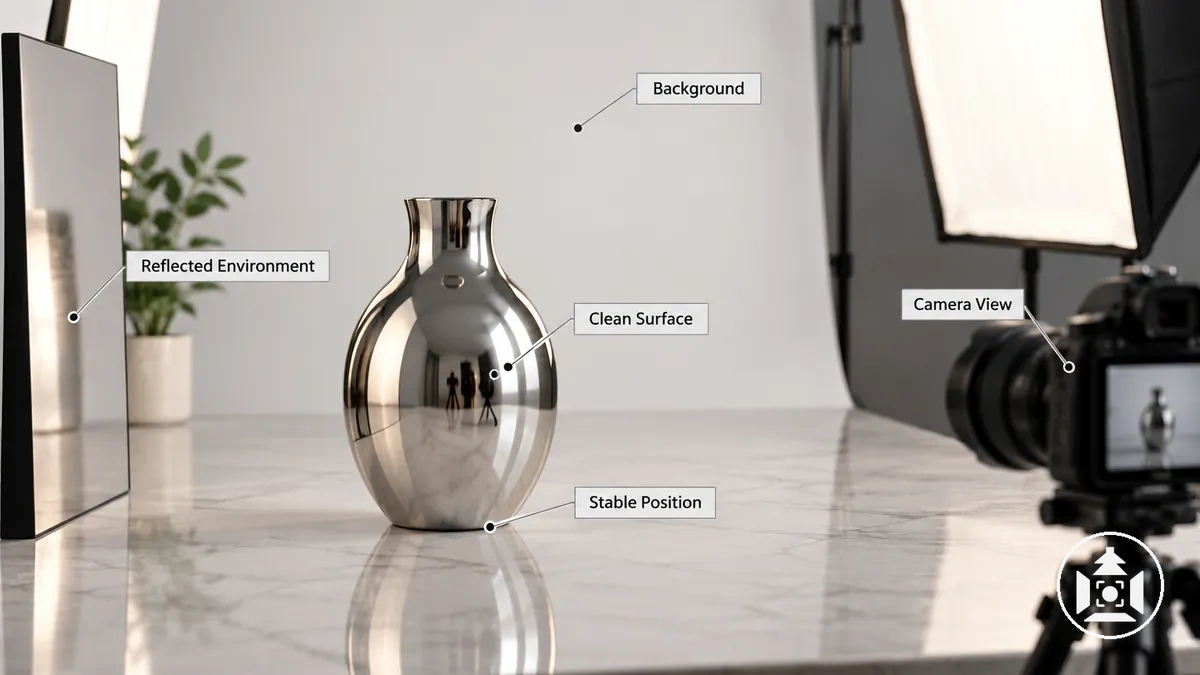
- Clean the surface. Clear visible fingerprints, dust, and smears using a method appropriate for the product material. Verify the clean surface by inspecting it for visible contamination before continuing.
- Secure the product. Establish stable positioning so the product orientation does not shift during preparation. Verify that the product remains in the intended position without movement.
- Set the background. Place a simple background behind the product and check that it does not introduce distracting visible or reflected detail. Verify the background from the intended camera position.
- Control the reflected environment. Control nearby room objects and surfaces that create unwanted shapes or brightness on the reflective product. Verify the reflected environment on the product rather than judging the shooting area only by direct sight.
- Take a test view. Inspect the complete setup from the intended camera position for contamination, movement, background distractions, or unwanted reflected surroundings. Continue when these preparation variables are controlled well enough for lighting refinement.
Verify the setup from the camera position before refining the light, because that viewpoint reveals which preparation variables are visible on the reflective surface.
This establishes a repeatable setup baseline for the lighting work that follows.
Clean and Position the Reflective Surface
Cleaning and stable orientation create a repeatable reflective surface before later angle or lighting adjustments begin.
Fingerprints, dust, and smears can become conspicuous when their position coincides with a visible highlight, so establishing a clean surface and fixed product position reduces capture-side defects and unwanted changes in reflection geometry.
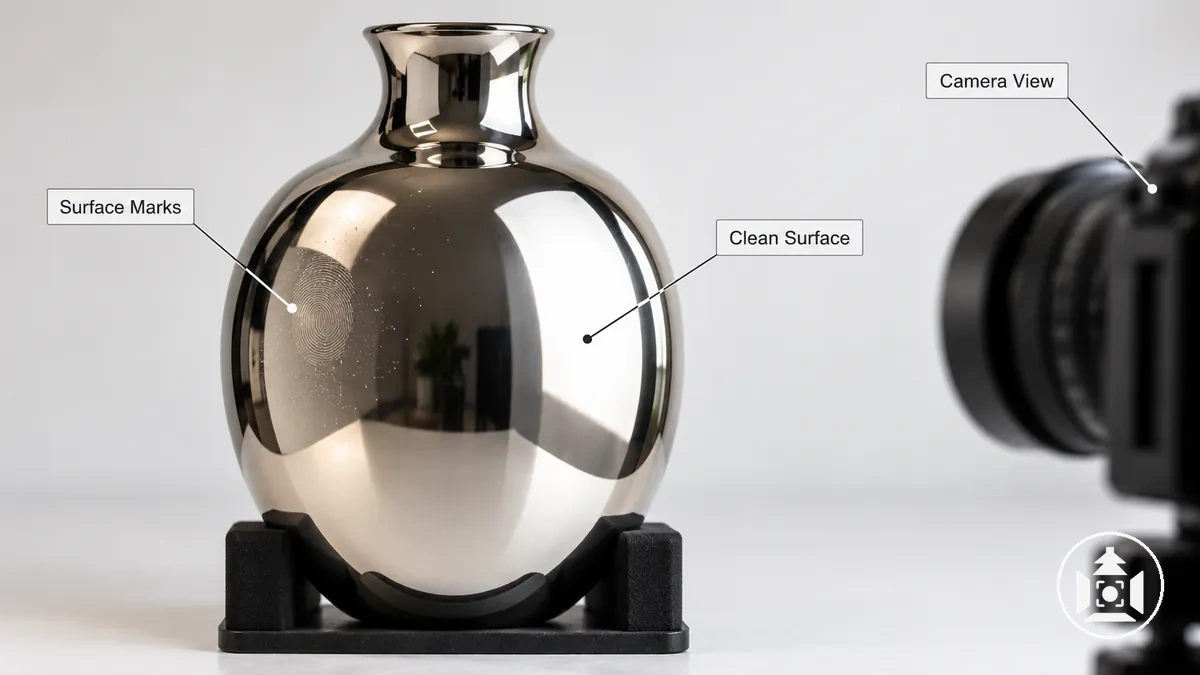
Clean the surface with a method appropriate for its material and finish, then handle it carefully to avoid adding new marks.
Secure the product in a stable orientation so its position remains repeatable between inspections.
Inspect the surface from the intended camera viewpoint, where fingerprints, dust, or smears may become more visible within reflected highlights.
Confirm that the surface is clean and the product position is stable to establish a repeatable baseline for capture.
Choose a Background That Stays Clear of Unwanted Reflections
A suitable background for a reflective product stays visually simple both behind the product and in the surfaces the product reflects, while maintaining enough edge contrast to separate the product outline.
Background tone, distance, surface sheen, reflected surroundings, and the product's surface geometry and viewpoint all affect what becomes visible.
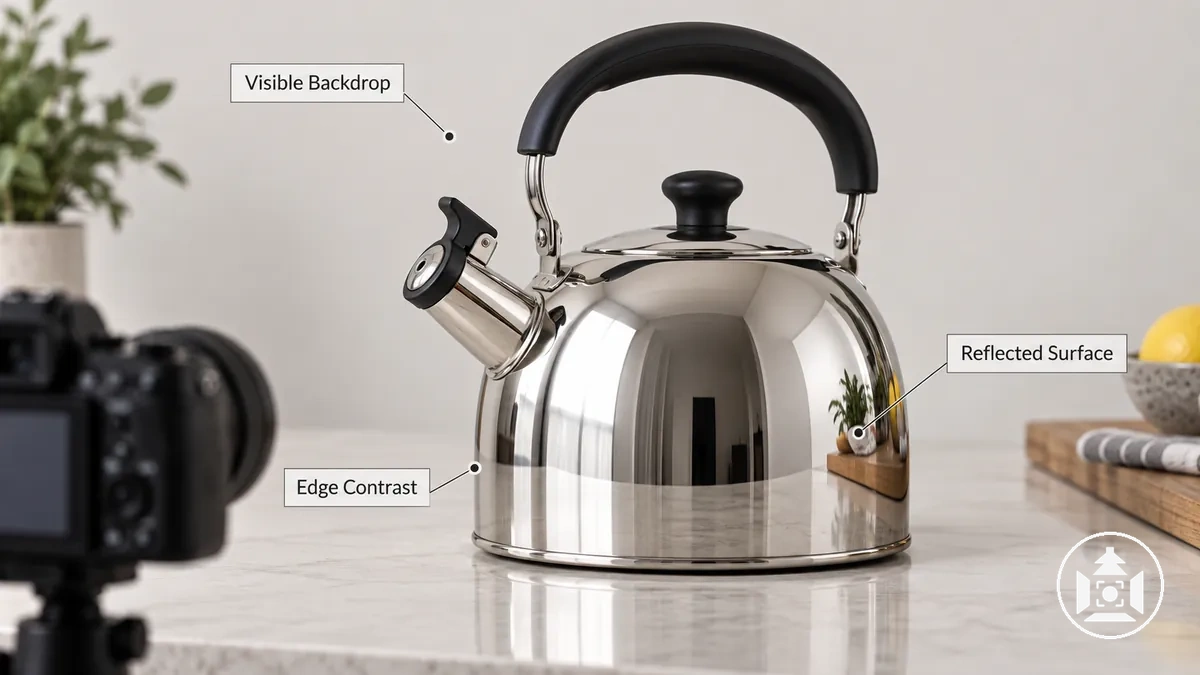
The visible backdrop in the frame and a reflected surface visible on the product can be different parts of the set, so evaluate them separately from the camera position.
Reflection-specific background control requires both to avoid distracting reflected detail while maintaining product separation; broader choices for product photography backgrounds extend beyond this criterion.
- Background tone: Evaluate the tone against the product colour and surface geometry. A brighter surface can create lighter reflections, while a darker surface can strengthen edge definition where it increases contrast with the product outline.
- Distance: Check how changing the separation between the product and background affects which background features remain visible directly or through reflections; there is no universal distance threshold for reflective products.
- Surface sheen: Evaluate whether the background surface appears as a distracting reflected shape or brightness variation. Its effect depends on the reflective product's geometry and the camera viewpoint.
- Reflected detail: Keep reflection-facing surroundings visually simple when busy objects, patterns, or shapes become distracting reflected detail on the product.
- Edge contrast: Check that the background and reflected surroundings provide enough separation for important product edges to remain distinguishable rather than blending into similar tones.
Evaluate the visible backdrop, reflected surfaces, and edge separation together from the intended camera position before proceeding.
Build a Large, Diffused Light Source for the Reflective Surface
A large source of diffused light is a practical starting condition for broad, controllable highlights on a reflective product, because increasing the apparent source size generally produces a broader, softer reflection than a small hard source.
The required source size and placement still depend on the product geometry and viewing angle, so judge the reflected highlight on the product rather than aiming for one fixed modifier size or distance.
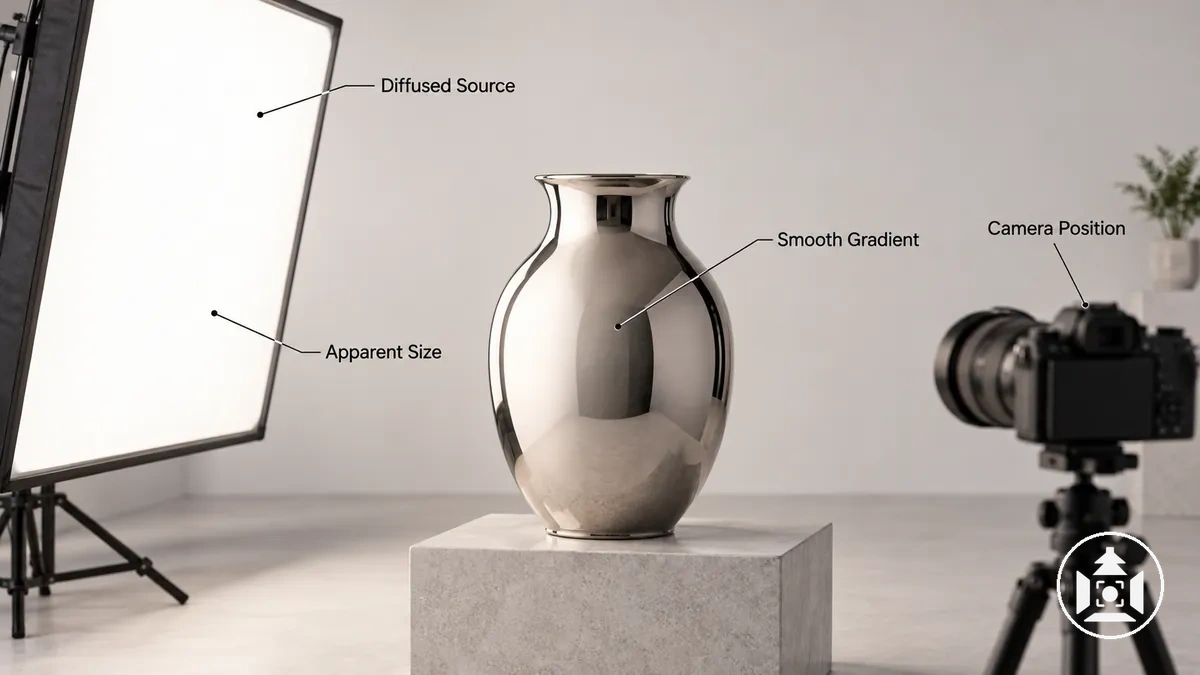
Apparent source size and diffusion influence highlight softness and the width of the reflected gradient, while source distance changes how large the source appears from the product and can therefore change the reflection.
Light placement determines where that reflected gradient appears relative to the product form and camera viewpoint.
Adjust these variables while watching for a small intense hotspot, an overly broad highlight that obscures form, or edges that become difficult to read.
- Place the source. Position the light so its reflection appears on the intended area of the reflective surface. Observe the highlight position and whether it follows the product form before continuing.
- Add diffusion. Place a diffusion surface between the light and product so the product reflects a broader luminous area rather than only a small hard source. Check whether the highlight becomes smoother and the gradient less abrupt.
- Adjust apparent source size. Enlarge the luminous area seen by the product or adjust source distance and placement when the reflection remains too narrow or concentrated. Observe the resulting highlight softness, gradient width, and edge readability rather than assuming that a larger apparent source is always preferable.
- Verify from the camera position. Observe the reflective surface from the intended camera position and adjust placement, diffusion, apparent size, or source distance if the highlight forms a distracting hotspot or obscures important product edges. Continue when the reflected highlight describes the product form clearly enough for capture.
The useful highlight width is the one that supports the product's form from the chosen viewpoint, not a fixed size target; product geometry, source distance, and placement can change the result.
Broader decisions about product photography lighting extend beyond this reflection-specific source-control step.
Make the Apparent Light Source Large Enough to Produce Smooth Highlights
Apparent source size, rather than merely the physical fixture size, influences the highlight width and edge softness visible on a reflective surface.
A larger-apparent source generally produces a broader highlight with softer edges and a smoother gradient, while a smaller-apparent source produces a narrower reflection with more abrupt edges.
Source distance changes apparent source size: with the physical source unchanged, moving it closer generally makes it appear larger from the product, while moving it farther away makes it appear smaller. That change can broaden or narrow the reflected highlight, so judge the result from the fixed camera viewpoint.
Product curvature and surface geometry also affect how much of the reflective surface the highlight occupies and how its gradient follows the product shape; on a flat or gently curved glossy object, changing apparent source size can therefore make the reflected highlight spread across more or less of the visible surface.
A broader highlight is not automatically preferable when a narrower reflection better maintains texture, shape, or edge separation.
Verify the result from the camera viewpoint and use the apparent source size that gives the required highlight width, edge softness, and product-form definition rather than applying a universal size target.
Position Diffusion to Shape Glare Across Flat and Curved Surfaces
Set the diffuser position and diffuser coverage according to the reflected gradient visible on the specific product from the fixed camera viewpoint.
Adjust the diffusion surface when the reflected light area forms an abrupt highlight or fails to describe the product shape clearly, then observe the reflection again from the same viewpoint.
A flat surface can show a more discrete representation of the diffusion surface because its orientation changes little across the visible area.
A curved surface changes orientation across its form, so the same diffusion panel can appear stretched or compressed into a different reflected gradient across the product.
The exact highlight shape therefore varies with surface curvature, diffuser position and coverage, and the camera viewpoint rather than following one fixed placement rule.
For example, if the same diffuser produces an abrupt highlight on a flat glossy product but a stretched gradient on a curved one, adjust its position or coverage according to the reflection observed on each surface rather than applying the same placement mechanically.
Verify each adjustment from the fixed camera viewpoint and continue when the reflected gradient describes the product form without an unnecessarily abrupt bright patch.
Control Reflections with Camera, Product, Light, and Surrounding Surfaces
Control reflections by coordinating the camera viewpoint, product orientation, light position, and nearby bright or dark surrounding surfaces.
Keep the composition fixed while diagnosing an unwanted reflection, then change one controllable variable at a time so its effect on the reflection remains observable.
Changing the camera viewpoint or product orientation changes which parts of the reflected environment fall within the reflected angle seen by the lens.
Changing the light position shifts the location and character of the reflected highlight, while surrounding surfaces alter reflected brightness and can strengthen or weaken edge contrast.
Because these effects also depend on product geometry and the reflected environment, identify what the product is reflecting before deciding which variable to change.
Exposure can alter recorded brightness, but it does not by itself change the reflection geometry that places an object or light in the reflective surface.
- Establish the composition. Fix the camera viewpoint and initial product orientation so there is a stable baseline for observing reflection changes.
- Identify the unwanted reflection. Observe where the distracting glare, shape, or brightness appears on the product without changing the setup.
- Trace what is being reflected. Determine whether the visible reflection corresponds to the light, a nearby bright or dark surface, or another part of the reflected environment.
- Change one variable. Adjust only the camera viewpoint, product orientation, light position, or relevant surrounding surface, choosing the variable connected to the identified reflection.
- Verify the result. Observe the same area again and compare it with the baseline before making another adjustment; continue one variable at a time if the unwanted reflection remains.
Stop adjusting when intentional highlights describe the product shape, important details remain readable, and reflected brightness provides useful edge contrast without a distracting unwanted reflection.
The objective is controlled reflection geometry, not a featureless surface with every reflection eliminated.
Change the Camera or Product Angle to Keep the Shooting Position Out of the Reflection
Changing the camera angle or product angle redirects which reflected rays enter the lens view, so a small viewpoint or product rotation can exclude the camera, photographer, light, or room object from a specular reflection.
The usable adjustment depends on the product's surface orientation and geometry while preserving the intended ecommerce composition.
At each local point on a reflective surface, the angle of incidence equals the angle of reflection relative to the surface normal. Changing the camera or product angle therefore changes whether the reflected path reaches the lens, while surface orientation determines which local reflections are visible.
The family of angles describes the range of positions from which a light or surrounding object can produce a visible specular reflection in the lens; it is a geometry concept, not a fixed 45-degree prescription.
A flat surface has a more uniform orientation across its area, while curved and faceted surfaces contain changing local orientations that can create broader or multiple reflection zones.
Adjust the camera viewpoint or rotate the product while observing whether the unwanted reflected path enters or leaves the lens view.
For example, if a room object appears in a glossy area, a small camera or product rotation can move that reflection outside the lens view while leaving the intended product framing substantially intact; verify the result from the final camera position.
This reflection-specific adjustment should preserve the required composition, while broader choices about angles for ecommerce product photos extend beyond reflection control.
Move the Lights to Control Highlight Shape and Edge Definition
Changing light position shifts the highlight location on a reflective product and can also change its highlight width, brightness, and gradient as source distance, source size, and surface geometry change.
The surrounding bright or dark field also affects edge definition, so judge each movement by whether the reflected highlight describes the product form while the product contour remains distinguishable.
Move one source at a time and observe from the camera position how its reflection shifts before making another adjustment.
If a frontal reflection produces distracting glare, move that light away from the reflected path and observe whether the highlight relocates while a controlled edge highlight remains; the exact result depends on the surface geometry and surrounding tone.
Verify that important highlight detail is not clipped or obscured, and stop when the gradient describes the form and the product contour retains sufficient edge definition.
Use White and Black Cards to Shape Reflections and Edge Contrast
White and black cards are positioned so their light or dark tones appear intentionally as reflections on the product, letting you shape reflected brightness and edge contrast without changing the product surface itself.
The white card can introduce or broaden a bright reflected area, while the black card can create a darker reflection or negative fill that helps define the product contour.
- White card: Introduces a bright reflection where a lighter reflected tone is useful for opening a dark area, extending a highlight, or separating part of the product from a darker surrounding field; adjust its placement according to where that bright reflection appears.
- Black card: Introduces a dark reflected area that can form a controlled dark line or strengthen edge contrast where the product contour lacks tonal separation; position it according to where the darker reflection is needed rather than treating negative fill as a universal glare fix.
Card size, distance, and placement affect how much of the card is reflected and where its reflected brightness appears, while product curvature and the surrounding background affect the resulting contour.
Adjust these variables while viewing the product from the camera position, and keep the card placement when the intended reflected tone improves edge contrast and product readability without obscuring important surface detail.
Use a Polarizing Filter When the Remaining Glare Responds to Polarization
A polarizing filter can reduce some remaining glare when the reflected light responds visibly to polarization, but the result depends on surface type, viewing angle, and filter rotation.
Polarization often has more practical effect on glare from glass and many non-metallic glossy surfaces than on reflections from bare polished metal. In every case, rotate the filter from the intended camera position and keep it only when the visible reflection improves.
Use it conditionally: if rotating the filter produces no useful change in the reflection, it adds little practical glare control for that setup.
Rotate the filter while viewing the product from the intended camera position and compare the glare and useful highlights across the rotation.
Check whether the distracting reflection becomes less prominent, whether useful highlights that communicate gloss or form are weakened, and whether the overall product remains readable.
Retain the setting only when the observed glare response improves the distracting reflection without removing useful material cues.
If the trade-off is unfavourable or the visible reflection changes little, do not rely on the filter for that product and viewing angle.
A polarizing filter does not replace diffusion, angle control, or management of the surrounding set, because its practical effect is limited by the polarization state of the reflected light and the surface and viewing geometry.
Keep geometry and diffusion as the primary reflection controls, and use polarization only when the actual product shows a beneficial response to filter rotation.
Adapt Reflection Control to Glass, Polished Metal, and Glossy Surfaces
The surface class changes which reflection-control variable deserves attention first because glass, polished metal, and a glossy surface present different combinations of transmission, reflected surroundings, and visible specular highlights.
The same control methods still apply, but their priority should follow the material's observed reflection behaviour.
Transparent glass transmits light while also showing reflections, so edge definition and distracting reflected areas may need separate control.
Polished metal can reproduce nearby bright and dark reflected surroundings strongly, making the reflected environment a major part of the visible product appearance.
A glossy coated surface usually retains visible colour or texture beneath a specular reflection, so a controlled highlight should reveal gloss and form without obscuring those details.
The comparison below connects each surface class to the first variable worth testing, the failure state to observe, and the corrective direction to try before changing additional variables.
| Surface class | Observed reflection behaviour | First control to test | Typical failure state | Corrective direction |
|---|---|---|---|---|
| Glass | Transmission and surface reflections can appear together, with edges becoming weak when surrounding tones provide little separation. | Light direction and diffusion | Glare obscures transparency or the glass contour blends into the background. | Test a more controlled diffused reflection or, when appropriate for transparent glass, backlighting that improves edge definition without assuming it suits every glass product. |
| Polished metal | Mirror-like areas strongly reproduce nearby bright and dark reflected surroundings. | Control of reflected surroundings | Room shapes, bright patches, or dark areas distort the apparent form or weaken edge control. | Change the surrounding bright or dark surfaces so the reflected pattern describes curvature and separates important edges. |
| Glossy surface | A specular highlight appears over visible colour, texture, graphics, or form. | Highlight position and diffusion | The highlight becomes harsh, broad, or bright enough to obscure product detail. | Adjust light position or diffusion until the highlight remains controlled while the underlying product features stay readable. |
These priorities are starting points rather than fixed material recipes because transparency, finish, curvature, coating, and product geometry can change the result within each surface class.
Capture a test frame after each adjustment and continue only when the actual product response confirms that the chosen control improves readability without creating a new reflection problem.
Capture and Check the Ecommerce Images
Final capture should follow a test frame → adjust → verify loop rather than relying on a single exposure.
Use each inspection pass to confirm that reflections, exposure, product detail, and edges are acceptable before proceeding to the final capture.
- Make a test frame. Frame the intended product angle and capture a test image that represents the planned ecommerce view. Confirm that the composition and product position are stable enough to evaluate the reflection pattern consistently.
- Perform a reflection check. Inspect the product for uncontrolled reflections, distracting bright or dark shapes, and weak edge definition. If a reflection distracts from the product, identify it before changing the setup.
- Adjust one light or angle variable. Change the relevant light position, camera angle, or product angle, then capture another test frame. Proceed only when the reflection becomes more controlled without introducing a new problem elsewhere on the surface.
- Check exposure and highlight detail. Inspect bright reflective areas for visible highlight clipping and confirm that important tonal information remains present. If the reflection loses surface information because the bright area is clipped, adjust the capture-side setup before continuing.
- Check product detail and edges. Confirm that labels, texture, contours, and other required product detail remain readable and that edge definition is sufficient for the intended view. Compare repeated angles when shooting a set so inconsistent product or camera positioning does not create unintended changes in the reflection pattern.
- Make the final capture and confirm it. Capture the final ecommerce image only after the reflection, exposure, detail, and contour checks pass. Inspect the final frame once more to verify that it matches the accepted test state before moving to the next required angle.
For example, a test frame may reveal a bright room reflection across a glossy surface; changing one angle variable and confirming that the reflection moves away from important product detail establishes the corrected state before the final capture.
Accept the image when reflections are intentional, exposure retains useful highlight information, product detail and edges remain readable, and the required view is consistent; file formats and post-production decisions remain outside this capture check.
Check Exposure, Product Detail, Edges, and Unwanted Reflections
Accept the reflective-product image only when product detail remains visible, edges are sufficiently defined for the intended presentation, and intentional reflections describe the surface without distracting artifacts or highlight clipping.
Reflective areas can conceal capture defects inside bright highlights, so the verification pass should connect each failed condition to the appropriate correction direction.
- Highlight clipping: Check whether important reflective areas retain visible surface information; if clipping removes required detail, correct the exposure or light shape before accepting the image.
- Product detail: Confirm that required labels, texture, contours, and other relevant details remain readable; if a reflection or bright area obscures them, correct the capture condition responsible for that obstruction.
- Edges: Check whether important product edges separate sufficiently from the background and surrounding tones; if edge clarity is weak, correct the relevant contrast condition.
- Intentional reflections: Confirm that visible reflections support the product's material and form rather than distract from it; if a reflection competes with important product information, adjust the relevant reflection-control variable.
- Room reflection: Inspect reflective areas for an unintended camera, photographer, room object, or other identifiable environmental reflection; if one is visible, correct the geometry or reflected environment.
- Final viewing check: Perform a whole-frame inspection at normal viewing size for ecommerce presentation, then a close inspection of reflective details to reveal local clipping, obscured detail, weak edges, or unintended reflections before accepting the image.
Repeat the Reflection-Control Setup for Additional Product Angles
For additional product angles, re-check reflections after every change in camera viewpoint even when the physical lighting setup remains largely unchanged.
A viewpoint change can alter reflection geometry, including reflection location, edge contrast, and which surrounding surfaces become visible, so preserve the successful setup as the baseline and adjust only when the new view requires it.
- Record the successful setup. Keep a setup record of the accepted camera, product, light, and surrounding-surface positions so the next view begins from the established reflection-control baseline.
- Move to the next required view. Change the camera viewpoint or product angle for the intended ecommerce image while initially preserving the established lighting and reflected environment.
- Re-check reflected objects and highlights. Inspect the new view for changes in highlight location, edge contrast, and visible surroundings; if these still communicate the product clearly, proceed without unnecessary changes.
- Make the smallest adjustment and verify. If the viewpoint creates a distracting reflection or weakens the intended highlight or edge definition, make the smallest adjustment needed and compare the result with the accepted image for visual consistency before proceeding.
For example, a front view may show a controlled highlight while a three-quarter view reveals a surrounding object or shifts that highlight because the visible reflection geometry has changed; correcting only the affected reflection can retain the established visual logic without rebuilding the setup.
Across an ecommerce set, consistency means preserving how highlights, edges, and product form are communicated rather than requiring the same physical light positions or reflection patterns in every view; verify each angle against that criterion.
Troubleshoot Glare, Hotspots, and Visible Room Reflections
Glare, a hotspot, and a visible room reflection are reflection artifacts that can arise from different cause classes, so the symptom alone does not establish one likely cause.
Identify the visible artifact first, then check whether its behaviour points to reflection geometry, light shape, exposure, or the reflected environment before choosing a corrective direction.
Reflection geometry is the first class to check when glare or a visible object changes with viewing angle, product orientation, or camera viewpoint; the corrective direction is to change the relevant angle or reflected surroundings while preserving product form.
Source size and diffusion are the next class to check when a concentrated highlight suggests that the reflected source shape is producing an undesirable bright area; the corrective direction is to modify the apparent source or diffusion rather than assume exposure is responsible.
Exposure is a tonal cause when important highlight information is clipped in the captured image, in which case exposure correction is appropriate, while an identifiable room reflection points to a visible element in the reflected environment that should be traced through the product orientation and camera viewpoint.
These checks distinguish possible causes without treating any single reflection artifact as proof of one cause.
Change one relevant variable, capture or inspect the result, and compare the same reflection artifact before making another change so the successful correction remains identifiable.
This reflection-specific diagnosis covers visible glare, hotspots, and reflected surroundings; broader product photography mistakes to avoid belong outside this troubleshooting boundary.
Use this diagnostic split to choose what to inspect first, while the symptom-specific subsections provide the detailed corrective actions.
Bright Hotspots or Clipped Highlights
A useful bright highlight retains product detail and usually transitions through a controlled gradient; brightness alone is not the failure condition.
A hotspot becomes problematic when its reflection is too small or abrupt for the intended product form, while a clipped highlight contains no recorded highlight detail in the clipped region.
A small, hard hotspot may point to insufficient source size or diffusion, so check the highlight shape before changing exposure and broaden or diffuse the apparent source when source shape is the problem.
If the bright patch changes location or shape when the light, product, or camera angle changes, check the reflection geometry and adjust the relevant placement or angle.
If a broad reflection has a suitable shape but important highlight information is clipped, check exposure and correct it at capture; lowering exposure is not a substitute for correcting a poorly shaped reflection because it can darken the product while leaving the reflection geometry unchanged.
The diagnostic contrast is a controlled gradient that retains useful surface information versus a clipped patch in which required product detail was not recorded.
Capture-side correction reaches its limit when the required detail is already absent from the recorded clipped region, so correct the responsible source shape, diffusion, angle, placement, or exposure and capture the detail before relying on post-production.
Editing reflective product photos can address recorded image information after capture, but it should not be treated as a way to restore detail that was never captured.
Camera, Photographer, or Room Visible in the Product
A visible camera reflection, photographer reflection, or room reflection is usually an environment-and-angle problem: a mirror-like surface reflects an identifiable object when that object falls within the reflected field reaching the lens.
Whether the reflected object appears depends on its position, the product's surface orientation, and the camera viewpoint, while frontal mirror-like geometry can limit how much of the shooting position can be excluded without changing the intended composition.
First, identify the reflected object and where it enters the product's reflected field; for example, a room opening or photographer silhouette visible in polished metal identifies part of the surrounding environment that needs control.
Test a small camera or product rotation and re-check whether the changed surface orientation moves the object outside the lens view while preserving the required product angle.
If the reflection remains, reposition the offending surrounding element or mask it with a suitable neutral surface, then re-check the composition and reflective surface from the final camera viewpoint.
With strongly mirror-like frontal geometry, the camera reflection may remain difficult to exclude completely without compromising the required composition, so verify the best capture-side balance rather than assuming lighting alone can conceal it.
Product Edges Disappearing Into the Background
A disappearing product edge indicates insufficient edge contrast where the product boundary meets the background tone or the tone visible in its reflected field.
Diagnose whether the edge primarily blends with the backdrop itself or reflects a similar surrounding tone, because the corrective direction differs even though both conditions reduce tonal separation and obscure the contour.
First, check whether changing the background tone or product-to-background separation improves boundary visibility without disrupting the intended surface appearance.
If the weak edge comes from the reflected field, position a white card or black card, according to the surrounding tones, so a controlled light or dark reflected strip defines the edge; for example, a polished or glossy product can regain a missing contour when the appropriate card reflection separates that edge while retaining its natural surface gradient.
Re-check light position if its reflection causes the edge to merge with adjacent tones, and adjust only the variable responsible for the loss of definition.
Prefer these capture-side corrections to changing global image contrast when the edge can be defined more accurately through background, reflection, light, or separation control.